Multi-factor authentication using Auth0

Project Background
Tier 2 have developed a Web Portal application for PredictImmune that integrates with the PredictSURE IBD test software to aid laboratory staff in the generation and management of their test reports.
Further information on the PredictSURE IBD software and Web Portal can be found here: https://tier2consulting.com/news/predictimmune/
As part of this project, Tier 2 have developed strict access controls to certain aspects of the Web Portal by implementing multi-factor authentication using Auth0. Tier 2’s Software Development Lead and project technical lead, Dan Bennett, explains more:
Securing Access to Sensitive Data
A few different report types are generated as part of the Web Portals workflow, including a Clinical Report which contains details on a patient’s IBD test results. Due to the nature of the data held within this report, it must be kept under strict access control whereby only authorised lab staff and the requesting Clinician are given access.
Access to a Clinical Report is provided on 2 tiers:
- Lab staff who are registered to use the Web Portal (by the lab manager or administrator) will be assigned access to the set of results for a run;
- Clinicians, who are external to a lab, are given access to a single report at a time via email.
To control this access for external staff (i.e. Clinicians) we implemented a multi-factor authentication mechanism.
Multi-factor Authentication
Multi-factor authentication is a process that requires a user to identify themselves by providing more than one piece of identifying information. This is usually achieved through a combination of the following authentication methods:
- Log in with username and password
- Authenticate using a secure link sent to an email address
- Push notification sent to a registered device
- Provide a code from an authentication app such as Google Authenticator
- Provide a One-time Passcode (OTP) sent via email
- Provide an OTP sent via SMS
- Provide an OTP sent via voice call
This helps ensure that only valid users can access their accounts. Take a look at the Auth0 Documentation for more information on multi-factor authentication mechanisms provided by Auth0.
Our Solution
To implement multi-factor authentication within the Web Portal we chose to use a combination of secure email link and OTP via SMS.
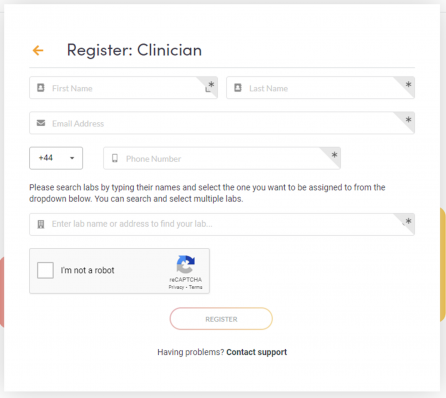
This process is relatively lightweight; it only requires that a Clinician self-register against a lab providing their name, email address (including verification) and mobile phone number:
Step 1: Secure Email Link
A lab staff member sends a report to a registered Clinician by selecting them from within the Web Portal application. The system then generates a secure URL and sends an email to the Clinicians email address.
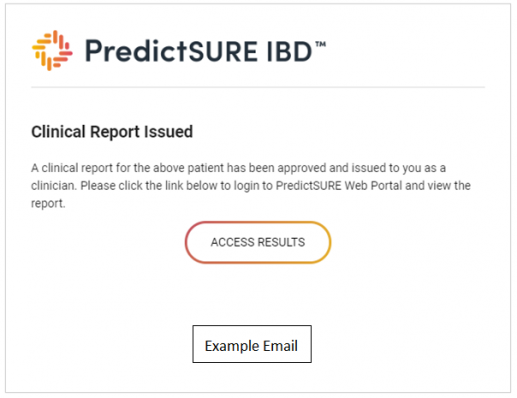
The secure URL (the Access Results button above) is generated with a JSON Web Token (JWT) as a way of securely representing the lab, user and report that the Web Portal needs to provide access to.
A JSON Web Token or JWT is a compact way of securely representing data to be transferred between two systems, (industry standard RFC 7519). To build the JWT we use the io.jsonwebtoken.jjwt library in Java:
Jwts.builder()
    .setSubject("Report")
    .claim("Lab ", labId)                        // Identifies the lab to which the results belong
    .claim("Clinical_Report ", clinicalReportId) // Identifies the clinical report
    .claim("User_ID", userId)                    // The Clinicians internal user ID
    .claim("Email_Address", emailAddress)        // The Clinicians email address
        .setExpiration(new Date())               // The date and time the token will expire
        .setIssuedAt(new Date())
        .signWith(SignatureAlgorithm.ES256, "MySigningSecret")
    .compact();
This will produce a 3 part dot-separated token as a String in a similar format to this:
"hhhhhhhhhhhh.pppppppppppppp.sssssssssssssss"
  header ^^     payload ^^    signature ^^
The information contained within the JWT claims (payload section) is used later to determine the limited access required and the expiration ensures that the access granted to the given Clinical Report is temporary (a Clinician may be sent further links if/when required by the lab staff). The JWT token is appended to the secure link as a URL parameter so the final output will look something like this:
https://{hostname}/clinical-report?token=aaaaaaaaaaaa.bbbbbbbbbbbbbb.cccccccccccccc
When the Clinician clicks/taps on the secure link they will be forwarded to the application where the system will validate the JWT token (including expiry check), extract the claims and verify them against data held within the system. We will cover JWT usage and verification in more detail in another post.
Step 2: One-time Passcode Verification with Auth0
Once the Clinician has passed the first stage of authentication using the secure link, they are presented with the second stage, which starts with the system automatically triggering an SMS message containing an OTP to be sent through the Auth0 Passwordless SMS API.
First, we create a request providing the following parameters:
- Auth0 client ID: from the Auth0 account
- Phone number: in this case the phone number of the Clinician
- Connection: always set to “sms” because we want the code to be sent via SMS
- Send: always set to “code” to tell the API to send a passcode
{
  "client_id": clientId,
  "phone_number": cliniciansPhoneNumber,
  "connection": "sms",
  "send": "code"
}
Using a Spring RestTemplate we send the request to Auth0’s Passwordless API for our configured domain (we will cover setting up Auth0 integration with Twilio in another post) and have it unmarshalled to a Java POJO class, Auth0PasswordlessStartResponse, using Jackson.
// Auth0 Passwordless-Start API URL
String url = "https://{domain}.eu.auth0.com/passwordless/start";
// Send request using a Spring RestTemplate
var response = template.postForObject(url, request, Auth0PasswordlessStartResponse.class);
// Check for any errors in the response
if (response.getError() != null) {
    // Do something with the error
}
Once the SMS has been received by the Clinician they will submit the given OTP into the Web Portal. The system then verifies the given code by calling Auth0’s Token API in a similar way to the Passwordless API by first creating a request providing:
- Auth0 client ID: from the Auth0 account
- Auth0 client secret: from the Auth0 account
- Phone number: must be the same one that the OTP was sent to
- SMS code: OTP provided by the Clinician via the Web Portal
- Connection type: always set to “sms”
- Grant Type: always set to “password”
{
  "client_id": clientId,
  "client_secret": clientSecret,
  "username": cliniciansPhoneNumber,
  "password": smsCode,
  "connection": "sms",
  "grant_type": "password"
}
Again using a Spring RestTemplate we send the request to Auth0’s Token API for our configured domain and unmarshal the response to a Java POJO class using Jackson.
// Auth0 Token API URL
String url = "https://{domain}.eu.auth0.com/oauth/token";
// Send request using a Spring RestTemplate
var response = template.postForObject(url, request, Auth0PasswordlessAuthResponse.class);
// Check for any errors in the response
if (response.getError() != null) {
    // Do something with the error
}
As before the response returns an error code and description which, if populated, mean that something went wrong during the request. On receiving a successful response from the Auth0 API the system forwards the Clinician on to the report page where they can securely view the report.
Failure Scenarios
If the authentication fails with any of the following scenarios then the user is simply denied access to the report:
- JWT token in the secure link has expired
- Clinician no longer exists in the system or against the given lab
- Auth0 is unable to send an SMS to the given phone number
- Invalid SMS code entered into the Web Portal
- SMS code is not provided before the given timeout