Suite Treats: Working with data in JBoss BPM

So you’re using Red Hat’s JBoss BPM Suite to design business processes? But you don’t just want a pretty diagram: you want business processes that actually work – and work with real data! That means figuring out how to:
- save your process instance data in a database;
- pass data in and out of forms
- make your process flow respond to the data you capture;
- display process instance data in task lists and notifications;
- use data-driven fields (picklists / radio buttons) in your forms;
- attach documents to your process.
You’re doing all this yourself, but guess what? You’re not a developer, and you’re restricted to the out-of-the-box tooling provided by business central. Well, hopefully you’re going to love this blog post, because it’s a collection of all the handy tips and tricks I’ve picked up for turning a BPM project from nice demo-ware into something your business can actually use.
Refresher
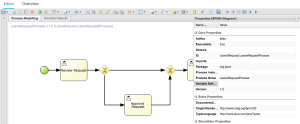
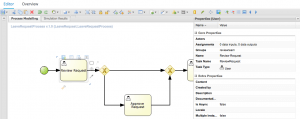
I’m going to assume you’ve got BPM Suite up and running, you’ve created the necessary Organizational Unit / Repository / Project hierarchy, and know the basics of designing a business process. Now let’s say you are trying to automate a simple process such as applying for annual leave. The process itself might look like this:
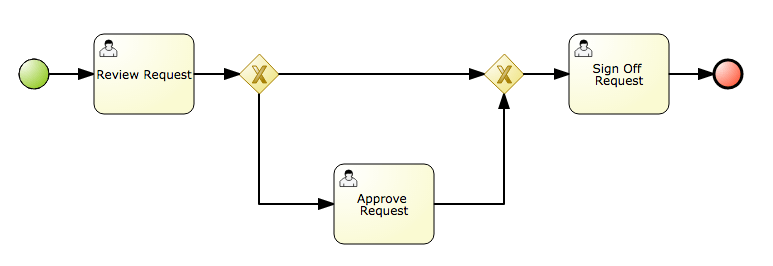
You’ll notice that all of these tasks are User Tasks, indicating that there will be forms for the various actors to view and/or complete data. The reason for the gateways is to support the fact that the Approve Request task is conditional, and may only be entered under certain circumstances (i.e. depending on some data).
It should be noted that if the decision-making is more complex, BPM best practice would be to separate it into a set of business rules which can be called during the execution of the business process. However, in this case, it’s a simple decision, so we’re not going to write any rules.
You’ll also notice that there’s no ‘reject’ option in my process – again, I’m trying to keep things simple!
Sherbert Dip
The first step in saving your BPM data into a database is to create a datasource. How you do this will depend on the application server in which you’re running your BPM instance: now, this isn’t a blog on configuring application servers, so I’m not going to give you a blow-by-blow on this, but suffice it to say if you’re using JBoss EAP it’s all documented in the configuration guide.
Once you have a datasource, you can configure the persistence settings of your BPM project to use it. Open the Project Editor and drop down the Project General Settings:
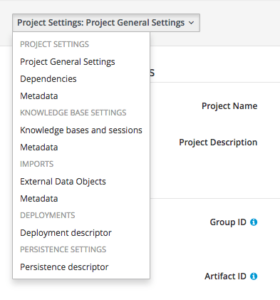
Now select the Persistence descriptor:
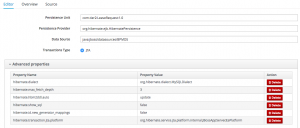
There are 2 things you need to change here:
- the name of the datasource needs to match the JNDI name of the datasource you created in your application server;
- the hibernate dialect needs to match whatever database vendor you’re using (in my case MySQL). Note that you need to drop down the Advanced properties to see the hibernate.dialect property.
Don’t forget to save the Project Editor when you’re done.
I’m going to assume you’ve already used BPM Suite’s Data Modeler to create the data objects that you want to use. What you may not know is that you can map these objects to a database table right up front, by choosing to make this a persistable object. When you make a data object persistable, at deployment time the BPM suite will create a database table whose name matches the object, and whose columns match the fields of your object. You can do this as soon as you create the data object, as illustrated below:
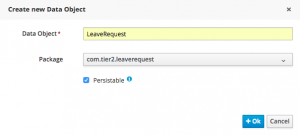
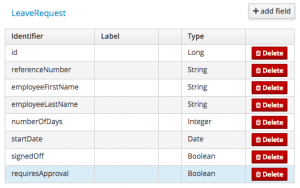
In your case, you might have a simple LeaveRequest object like this:
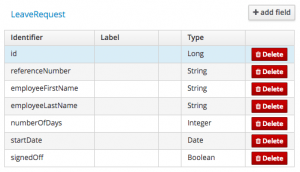
Note that the id field is added automatically because this is a persistable data object.
You’ll also notice that at no point have I added labels to any of the fields. This is simply because, in the current version of BPM suite, you have to add labels to form fields manually. So if you add them here, you’ll be typing them in twice!
If for any reason BPM fails to create the appropriate table at deployment time, go back into the Persistence descriptor and check the project’s persistable data objects:
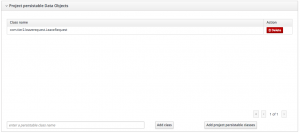
If your object isn’t listed, click the Add project persistable classes button and your class should appear in the list. Again, remember to save when you’re done. Note: if you ever remove any persistable classes from your project, that won’t delete any underlying tables that have already been created. You’ll have to drop those tables manually in the database.
A final tip on data modelling: at some point you’re probably going to need to create reports based on your business data. And in those reports, you may want to combine this data with BPM’s existing process instance and task data. If so, I’ve found it useful to save the id of the process instance along with the business data so that you can link the two together whenever you come to create the report. So you may want to include another field in your data model, called processInstanceId or something similar. To actually save it, sorry, but on this occasion there’s really no alternative but to write a bit of Java. Fortunately, it’s pretty straight forward: we’re going to get the current process instance id out of the process context, then call a method on the LeaveRequest object to set a value. The code looks like this:
![]()
Put the code in the On Entry Action of one of the user task nodes – any one will do, so long as it’s done before the process ends. That way, you’ll save the process instance id along with your leave request data, and when you come to design your reports, you can do a SQL join to the existing ProcessInstanceLog and NodeInstanceLog tables via your processInstanceId column.
Fruit Salad
So, how do I ensure that when I enter data in forms, this data is being saved in the database? This is all about data origins.
You want to bind your form to whatever data you’re going to be saving. Let’s say your process form – the form that kicks the process off – is going to capture all the details of the leave request, so your data origin will be the LeaveRequest data object:
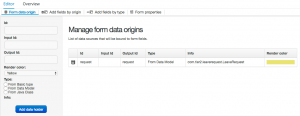
You always need to give the data origin an internal Id, which is how you’ll refer to the data while it’s inside the form. You also need at least one of either an Input Id or Output Id, depending on whether data is entering or leaving the form (and in some cases, both!). In this case of this particular form, it appears at the very start of the process, so there is no need for an Input Id, but we need an Output Id in order for the process to be able to grab this data once the form is closed. Chose your Output Id carefully, as you’ll use it again later: in this case, it’s called request.
Once you’ve created the data origin, you can add whatever fields you need to the form:

In this case, you’re unlikely to need:
- id (depending on your database, this is usually an auto-id column);
- referenceNumber (completed in the Review Request task);
- signedOff (completed in the Sign Off Request task).
You can either add the fields one-by-one, or add them all by clicking on the name of the data object and then deleting the ones you don’t need – I usually do the latter as my data objects frequently have a lot of fields!
Flying Saucers
Now, how do I ensure that the data I’ve entered on my form is available to the business process. And crucially, how do I ensure that the same data object is being passed around from form to form? This is all about Process Variables and Assignments.
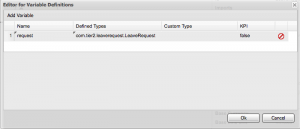
You will want the request object that was created in the process form to be associated with the business process as a whole. So, the first thing to do is create a variable that stays in scope for the whole process and is of the appropriate data type. In the business process designer, select the white space in the background of the diagram, and open the properties sheet:
Click on the dropdown arrow next to Variable Definitions, click Add Variable and create a new variable called request of type LeaveRequest. It’s vital that you use this name, as that’s the name we used as the Output Id from our process form. By using the same name, we automatically populate the request process variable with the data that we captured on the form.
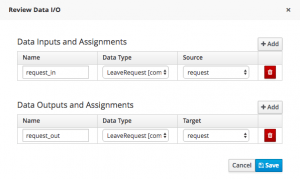
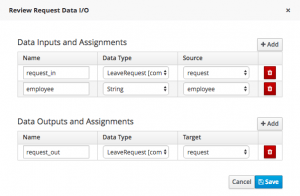
Now, select the task associated with the form that you want to pass data into – in our case we’ll select the Review Request task. Open the property sheet of the task and look at the Assignments property – you should see there are currently no data inputs or outputs:
Click on the dropdown arrow next to Assignments in order to source the data that the form is expecting from the process variable, and to re-populate that process variable once the task is completed. I’m going to assume you’ve already created the Review Request task form, and that its data origin has an Input Id of request_in and an Output Id of request_out. So your assignments should look like this:
Now when you run the process, the request data that you see at Review Request stage is the same data that you captured at the beginning of the process.
An additional tip for the Review Request task form: you’ll probably want to display a lot of the previously-captured data in read-only mode, which you can do by setting the Read Only property on the field. However, this only prevents you from typing inside the field: it doesn’t necessarily prevent the value of the field from being set programmatically. You’ll notice that form fields also have Input and Output Binding Expressions (at the very bottom of the properties sheet):

To be truly read-only, I would remove the Output Binding Expression of the field. That way, even if the system overwrites an un-populated field with ‘null’ – which has happened to me on more than one occasion – that value cannot be saved back to the underlying data object.
Black Jacks
If your data object is going to be passed around inside your business process, you might be tempted to add some fields that reflect either the status of the request, or the decision-making process around its approval, for example:
Let me tell you why you shouldn’t do this!
- Red Hat best practice is to avoid using control facts i.e. fields that don’t correspond to actual business data, but exist purely as a means of controlling process flow. This is mostly related to business rules, but it applies equally to processes;
- there are other ways to determine flow without storing control facts e.g. using process variables;
- don’t store data that you don’t need. Even if you need to report on request status, or which requests did and did not require approval, you can find this out using BPM’s existing process and task node logs, so don’t store this data twice.
So what are the other ways to determine sequence flow? My preference is to define a Process Variable of type Boolean, and populate it using a simple if statement in the On Exit Action of my task. Then all your gateway has to do is evaluate whether this variable is true or false.
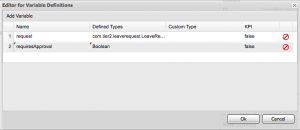
Let’s define a Boolean process variable called requiresApproval, as follows:
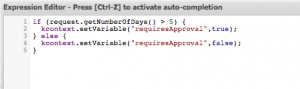
Select your Review Request task node and click the On Exit Action property. Here’s an example code snippet which populates the requiresApproval variable based on the value of the numberOfDays field of the request object:
Now, select the output sequence flow that joins your Review Request task to your Approve Request task. You’ll want to follow this flow only when the request requires approval, so click on Expression in the properties sheet and add the following:
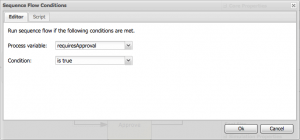
You’ll need to add a corresponding Expression for the other sequence flow (where approval isn’t required), and then you’re done!
You can also add Java code for more complex expressions, but as I mentioned earlier, any complex decision-making should really be separated out into business rules – and there’s another blog post right there!
Fried Eggs
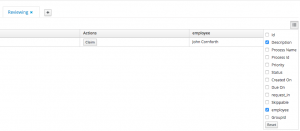
One of the frustrating things about the Task List in business central is that all of the columns available to you relate to internal BPM process data, rather than business data. So, for example, it can show you things like Process Id, Process Name, Description, Priority and Status, but you won’t see any data relating to the actual Leave Request that you’re working on. This can be very frustrating if you’re presented with a task list full of leave requests, and you don’t know which one is which!
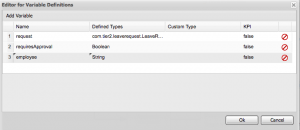
One way I’ve found to get around this is to put the business data that you want to display into a Task Variable, which you can then display in a custom filter in the task list. It’s a pretty convoluted solution, so I’m going to go through it step by step. Let’s say, for instance, you want to display the employee’s name: create a new process variable called employee of type String:
You’ll need to populate this variable with some code. Select your Review Request task node and click the On Entry Action property. Note that you need On Entry here, as opposed to On Exit, because you need to pass this data into the task. Here’s an example code snippet:
![]()
Now create an Assignment which inputs this data into the task – effectively creating a Task Variable. Note that you’ll have to do this on every task where you want to display this data:
Right, that’s the design work done. Now build and deploy your process, run up an instance and go to your task list. BPM Suite allows you to create custom tabs on this list, which can filter tasks in a variety of ways. Click on the ‘+’ button adjacent to the current list of tabs:

In the popup, type whatever name you like, then click Filter to enter a filter criteria. In this case, we need to filter on task name, as this is the only way you can display task variables. Drop down the select column list and choose name, then drop it down again to choose equals to, and finally type the task name in the value field:
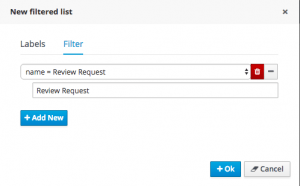
Click OK, and now when you drop down the list of available columns in your task list, you should see employee!
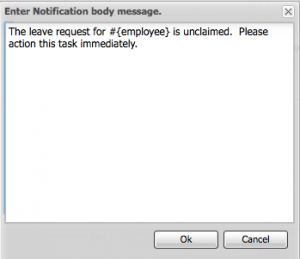
You may also want to see process or task instance data in your email notifications. This is an easy one! Notifications can reference process variables by #{processVariable} and task variables by ${taskVariable}. So, for example, if I want my notification to include the employee name, I can do something like this:
Candy Necklace
Dropdown lists can be a bit of a conundrum in BPM forms. On the one hand, there’s quite an easy way to create them, but this has some limitations; on the other hand, there’s a way to achieve exactly what you want, but this requires custom development.
The easy way is to use a Short Text field, and configure it with a Range Value consisting of a simple list of name/value pairs:
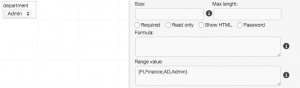
As you can see, the syntax for the Range Value property is:
{value 1,display name 1;value 2,display name 2;etc.}
And if you’ve got it right, you should be able to test the dropdown in the Form Modeler, without the need for deployment!
However, the limitations of this approach are that, firstly, the total length of your list should be no longer than 256 characters – including the commas, semi-colons and curly brackets! The other limitation is in the way the list is sorted: by default, the sort order is by value, not name, which is a bit irritating, as the list may appear to display in a random order. Unfortunately this is the only option you have using this method, as far as I know.
Now for the hard way: it’s actually not hard if you’re already a Java developer, but I appreciate it might be a stretch for the average business analyst. What you need to do is implement your own Data Provider class, as illustrated here:
Once you’ve written it, you need to jar it up and then add it to the classpath of your BPM installation – maybe get an adult to help you with this bit!
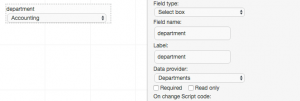
Then within the form, you should change your field type to either Select Box or Radio Group, and if you’ve successfully added the jar to the classpath, you should be able to select the name of your class in the Data Provider property, as shown below:
A full description of this solution, and sample downloadable project, is available from Red Hat here.
The advantages of this approach are that you can have as many items in the list as you like, and also the items will appear in whatever order you need them to.
Brown Jazzies
You may have read that you can upload documents to BPM forms during the execution of a business process. These documents can be passed around the various user tasks, to be viewed and downloaded (and re-uploaded if necessary). There’s even a tab for it in the process details view! So, how do you do it? Well, based on what I’ve told you so far, you can probably guess that you’ll need to:
- add a process variable to refer to your document;
- configure the input and output assignments to pass the variable into (and out of) every user task where you want to use the document;
- add a form data origin to the corresponding form of each user task;
- add a field of type Document to each form, with the appropriate input and output binding expressions.
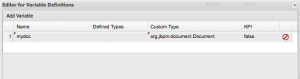
Sounds great – nothing new or radical there! Well, no, apart from one small detail: in order to create the process variable, you need to know what data type BPM considers these documents to be. Drum roll, please…
org.jbpm.document.Document
When you’re creating the process variable, you need to avoid selecting a Defined Type. Instead, type the fully-qualified class name into the Custom Type field, as illustrated below:
So, logically, this should work now, right? Wrong! You have to have a marshalling strategy. Who’s he when he’s not having his head cut off? Well, marshalling is all about gathering up the data from one or more sources, and organising or converting it for passing into a destination. Put another way, this tells BPM that when you’re working with a jbpm document, it might be a Word doc, or a PDF, and it needs to be handled accordingly.
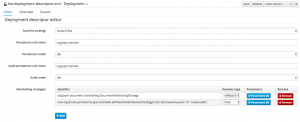
To set up the marshalling strategy, Open the Project Editor and drop down the Deployment Descriptor:
- in the Marshalling Strategies section click the Add button;
- enter the Identifier:
org.jbpm.document.marshalling. DocumentMarshallingStrategy
- in the Resolver Type dropdown, select mvel;
- remember to Save the deployment descriptor!
Now, once you’ve built and deployed the project, you should be able to attach documents, download them, re-upload them and view them in the Documents tab of your process details view.
You may be wondering what happens to these documents once the process ends, and where do they get stored? Well, the answer is they’re buried in a deep and dark directory within the BPM Suite server. If you really want to have access to them once the process is finished, you need to look at implementing Pluggable Variable Persistence, which is a means of outputting jbpm documents to whatever back-end system you like, be it the file system or your own CMS. This is way outside the scope of this blog, but you can find out more information on it in the BPM Suite user guide.
For now, I wish you the best of luck with your BPM processes, and hope you’ve found this post useful. It was certainly a long one – I’m off for a lie down now!