Red Hat AMQ 7 Basics

In this blog post, John Cornforth, Tier 2’s Head of Service Delivery, will attempt to give you some context around the Red Hat AMQ 7 messaging product, its history and features, and then explain how to install, configure and test a simple AMQ 7 message broker. We are going to assume you’re already familiar with the concepts of message-oriented middleware and message brokers, but if not you might want to start here: Messaging Concepts
A Little Bit of History
Any of you familiar with the history of JBoss and messaging systems will be aware that there have been rather a lot of them over the years! Starting back with JBoss MQ, moving through JBM and HornetQ, to the various iterations of ActiveMQ, the good people at JBoss, and latterly Red Hat, have had a hard time settling on one. The picture is further complicated by the fact that Red Hat makes a distinction between the message broker that is a standalone product, and the one that is embedded in their application server product, JBoss EAP. It hasn’t helped that on occasion these have actually been different technologies e.g. Apache ActiveMQ was the basis of the standalone messaging product at the same time as HornetQ was embedded in JBoss EAP. Not surprisingly, when explaining this to customers and students, I have been known to use phrases like “pick one” and “you’ve still got time to change your mind one more time before dinner”.
Fortunately things have calmed down somewhat in the last couple of years, to the point where we have the standalone product that is Red Hat AMQ 7, and the embedded broker AMQ Artemis, both of which are based on the same open source project, namely Apache ActiveMQ Artemis. This project is a merger of the best bits of the original Active MQ and HornetQ projects, and it’s a big help to have a standardised technology base from which to work. So, having clarified that technology base and given you some context, what does Red Hat’s latest messaging product actually do?
AMQ 7 Features
If you read the blurb, AMQ 7 is supposed to “provide fast, lightweight and secure messaging for Internet-scale applications” which is pretty much what you would expect. However, its key differentiating features are:
- support for multiple messaging protocols, including AMQP, MTT, OpenWire, STOMP and WebSocket;
- implementation of JMS 1.1 and 2.0 API specs;
- administration of all components via a single JMS or REST management interface;
- a bundled suite of AMQP and JMS clients, adapters and libraries known collectively as “AMQ Clients”;
- perhaps most crucially, as well as the standard message broker, an Interconnect Router component, allowing flexible routing of messages between AMQP-enabled endpoints without the need for an intermediary broker. As well as being highly scalable, this router-based approach is also used to provide high availability as an alternative to the traditional master/slave broker approach.
Some of the advanced features described above will be the subject of future posts, but for now let’s concentrate on the basics of getting it up and running.
Software Download & Installation
Installation of AMQ7 is quite straightforward. You need to get the software from Red Hat Customer Portal, and at the time of writing the latest version of the broker is 7.7. You will need to click on the first download link in the list illustrated below:
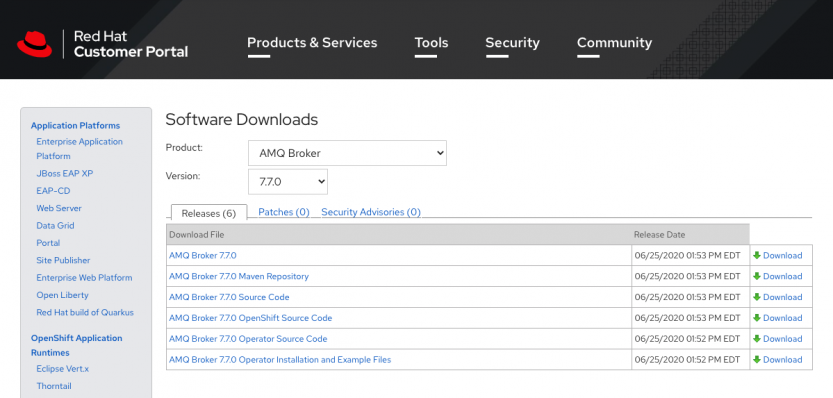
This will download a zip file – amq-broker-7.7.0-bin.zip – which can be unzipped in the directory of your choice. And that’s pretty much it: AMQ 7 is now installed, but you haven’t actually created a broker yet. That comes next!
Basic Broker Set-up
This is probably the trickiest part of the whole setup process, and unfortunately it’s horribly confusing if you’re trying to follow the official documentation – at least it was for me. You need to remember the following:
- even though the software installation directory has a bin directory containing commands, you don’t actually start and stop your broker from there. You only use this directory to run the initial artemis create command that sets up your broker instance;
- your broker instance will be created in a separate directory of your choice, which you can either make beforehand, or the artemis create command can make it for you. It can be anywhere: it doesn’t have to be underneath or relative to the software installation directory;
- once created, this broker instance directory will have its own bin directory which is where you run the start/stop commands for the broker. It also has subdirectories for all the broker’s log and data files;
- the artemis create command will ask you where you want your broker instance created: if you don’t specify a full path it will create it relative to wherever you are and if you’re not careful you could end up creating it underneath the bin directory of your software installation, which is going to get really confusing! My recommendation, based on bitter experience, is to specify the full path, but you could also create the broker instance directory up front, and sit in this directory when you run artemis create. That way, you can just specify . as the location for your instance.
So to illustrate the above, here is an example of the setup process I performed on my machine, which is a MacBook Pro, but the basic steps should apply equally to Linux and Windows installations. We’ll assume the software is already downloaded and unzipped inside a parent directory of /Users/jcornforth/Developer:
1. change into the bin subdirectory of the software installation directory:
cd /Users/jcornforth/Developer/amq-broker-7.7.0/bin
2. run the artemis create command specifying the full path of the broker instance directory. Note that I haven’t created this directory yet, the command will create it for me:
./artemis create /Users/jcornforth/Developer/getwokegobroker
3. follow the prompts to set the username and password, and to allow anonymous access (I usually go with Y for development purposes)
4. change into the bin subdirectory of the broker instance:
cd ../../getwokegobroker/bin
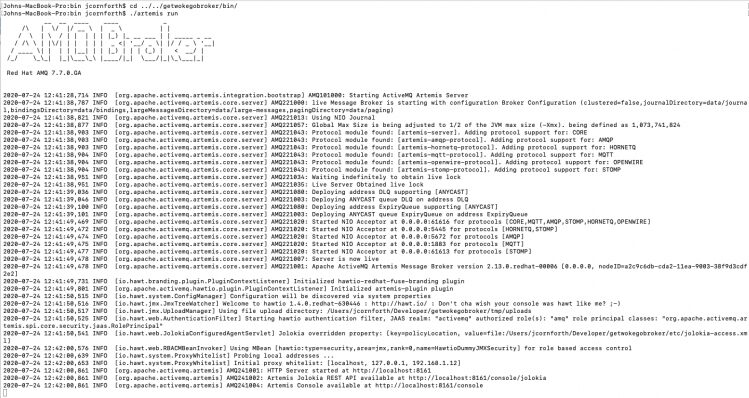
5. start the broker:
./artemis run
The broker should start, and here’s what you should expect to see in the terminal window:
You can shut down the broker either with Ctrl + c or by shutting down the terminal window. Alternatively you can run the broker as a background process using:
./artemis-service start
Message Testing
Once the broker is running you can test its operation quite easily using AMQ 7’s provided command line tools:
artemis producer puts a specified number of messages on a destination
artemis consumer reads a specified number of messages off a destination
In both cases, you need to specify:
- the number of messages you want to produce or consume;
- the address (e.g. queue name) you want to use: you can use any destination name, and AMQ7 will create it if it doesn’t exist;
- the URL of the broker: if it’s the local broker, it will be tcp://localhost:61616.
Here’s an example of a command that puts 100 messages on the myqueue queue:
./artemis producer –destination myqueue –message-count 100 –url tcp://localhost:61616
Here’s an example of a command that reads 50 messages off the myqueue queue:
./artemis consumer –destination myqueue –message-count 50 –url tcp://localhost:61616
Monitoring the Broker
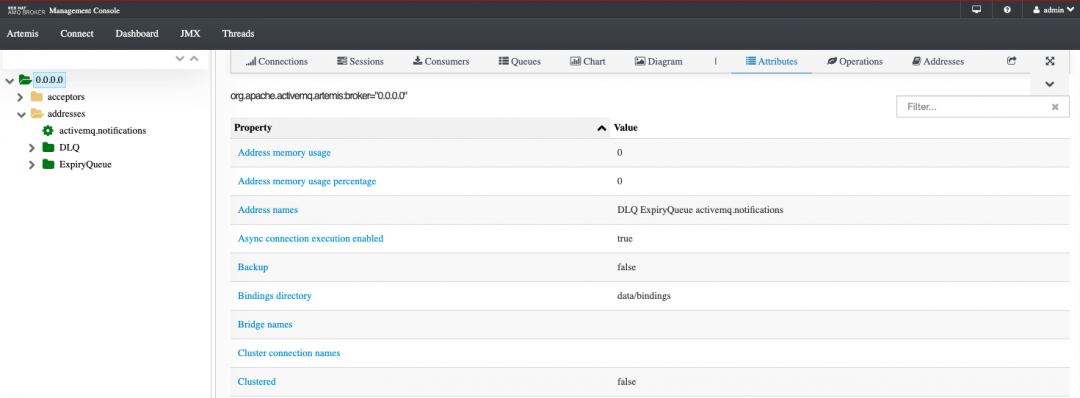
Once you have tested the broker, it’s a good idea to monitor it so that you can see the destinations and read their message counts etc. Again, AMQ 7 provides you with a tool to do this, in this case a web-based management console. You can access it by firing up a browser and going to https://localhost:8161. You’re presented with a web page with options for Management Console and AMQ 7 Documentation, so select the Management Console option and log in with the username and password you set during broker setup.
You should see a screen like this:
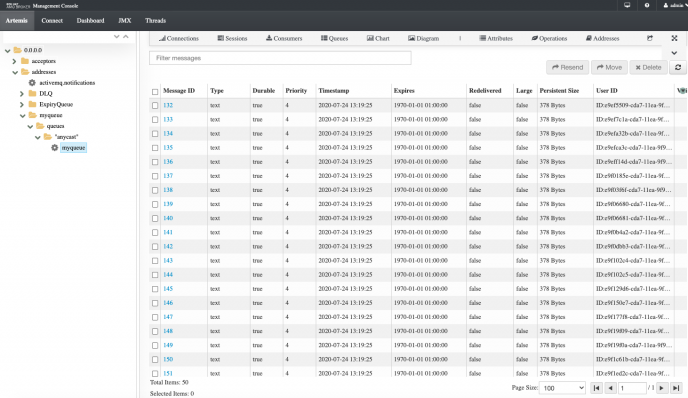
The most common operation in the management console is to view destinations and their associated messages. Do this by expanding the left-hand folder structure: under addresses you should see the name of your destination listed, and from here you can navigate down to the actual queue name. On clicking the queue name, you can see a pageable list of messages, plus the message count, as illustrated here:
Other operations, including re-sending, moving and deleting messages can be executed from within the management console, although I prefer to do this via actual messaging clients, such as the command line consumer/producer, and use the management console primarily for monitoring.
Summary
Hopefully this post has given you some insight into the basics of using the AMQ 7 message broker. For detailed installation and configuration instructions, the official Red Hat documentation is at
and if you need any additional information on AMQ 7 or what we do at Tier 2, please contact us.