OpenShift POC Story

Greetings. I recently had the opportunity to shadow a Red Hat consultant for a week on an OpenShift PoC for one of our customers. The objective of the PoC was to install a highly-available OpenShift v3 cluster in Amazon’s public cloud, create some sample applications, demonstrate the ability to scale those applications up and down, and provide options for a continuous delivery pipeline. That might sound like a tall order, but in fact it’s exactly what OpenShift is made for.
For anyone not familiar with what OpenShift is, put simply it’s life from lifelessness. No, wait, that’s Genesis. OpenShift is Red Hat’s container platform, which uses a combination of the Docker and Kubernetes technologies to create, orchestrate and secure containers in private, public or hybrid clouds. For a fuller explanation of OpenShift, and container technology in general, take a look at this:
The Word (Girl)
The first thing we did on the PoC was to make sure we were all talking the same language. Here’s a glossary of the most important OpenShift words:
- Master – one or more servers representing the orchestration engine of the platform, home to the ‘Scheduler’ (the thing that makes decisions about where apps are going to run). It’s also where the cluster’s datastore lives, and where you connect when wanting to use the management API or web console;
- Node – the server(s) where applications are hosted;
- Pod – the OpenShift wrapper around a container. The pod provides a container with a connection point to the software defined network within OpenShift. Although it’s not common, you can run multiple containers in a single pod if you need your apps to be tightly coupled;
- Project – where all development is done, and a common namespace for an application. Access controls exist to keep projects separate from each other;
- Service – a stable and consistent name for an application. It’s useful because IP addresses are not reliable – they could be constantly changing as you scale your applications up and down. The service is only accessible within the OpenShift environment;
- Route – a hostname which is attached to a service to provide an access point to the application from the outside world;
- Image Stream – one or more Docker images, similar to a Docker repository, on which you can base your application;
- Build Config – a screen (and underlying YAML file) in the OpenShift admin console that describes how to build container images;
- Deployment Config – a screen (and underlying YAML file) in the OpenShift admin console that describes how to run pods and version deployments.
Provision
The first (and probably hardest) step to actually set up our cluster was to provision an environment in Amazon AWS. Because this particular customer wanted not just high availability for their applications, but for the OpenShift environment itself, we needed a relatively complex setup comprising the following:
- 3 x Masters;
- 5 x Nodes: 2 to be used as routers for the software defined network, and 3 for applications;
- 3 Amazon availability zones in order to guarantee separate physical hardware;
- 6 subnets: a private and a public subnet per zone;
- A “bastion” server, or jump box, to ensure there is no direct access to the masters or nodes via the public internet;
- 3 elastic load balancers: one internal for API calls, one external for the web console, and one for applications (using a wildcard DNS so that you can host multiple applications without having to change DNS settings).
Cupid & Psyche 85
The actual installation of OpenShift is quite simple. Although there is a graphical installer, for this environment it made sense to have a scripted install (there were 8 servers after all!). So we ran a couple of Ansible scripts: the first to register the Red Hat subscription; the second to perform the installation, which required a few tweaks to set some variables, including:
- the Linux user used to run OpenShift (with sudo);
- the deployment type (in this case OpenShift Enterprise);
- the identity provider (we used simple http username/pwd, although you can link it to a corporate LDAP);
- addresses for internal and external load balancers;
- node defaults, including max pods, image garbage-collection thresholds and time-to-live;
- node labels to denote roles and purpose (e.g. target=router, purpose=infra);
- some basic port configuration.
The install script took about 30 minutes to complete. You also need a minimum of 2 SSL certificates for OpenShift: one for the admin console and one for metrics. We used self-signed certificates for this PoC.
Boom! There She Was
Once the installation was done, we could get our applications up and running pretty quickly. We used the admin console to create our first project, and an application within that project. OpenShift provides templates to allow you to choose the type of base image you want, ranging from a particular flavour of Linux, or your choice of programming language, right up to a specific application platform or stack. Red Hat also offers pre-built containerised images of their own middleware products (such as EAP, Fuse, BPM and Mobile) for use with OpenShift, referred to as xPaaS images.
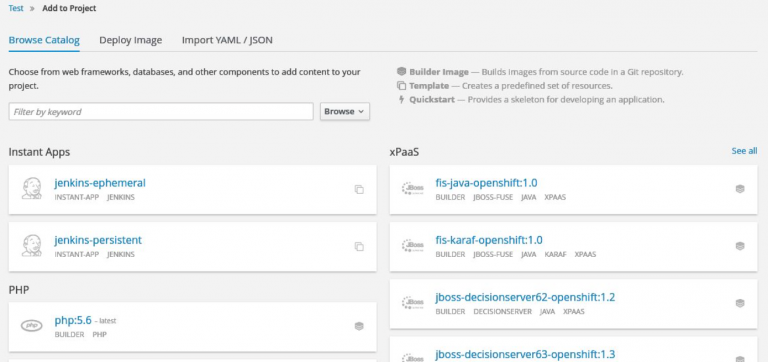
I used the source-to-image method of application creation, which only requires 2 things:
- selection of a template, e.g. PHP application;
- location of the source code repository.
Once these were selected, the following things happened automatically:
- a container image was built from the template and source code;
- the relevant pods were created and spun up;
- the application was made available via a route.
So, my new application was built, deployed and made accessible in a couple of clicks! Obviously this method doesn’t preclude you from creating your own images and loading them into OpenShift’s Docker Registry for later use, but it’s a great way to get up and running quickly.
Wood Beez
Although there is a lot you can do with the OpenShift admin console, there’s also an awful lot you can do (in many cases more quickly) with the command line tool – ‘oc’. To set it up, you need to do the following:
- download the command line tool via a link in the admin console;
- the download page also contains a session token which you can use to login to your OpenShift platform – copy this token;
- unzip the download;
- run the ‘oc’ executable with the ‘login’ command and the token.
Once that’s done, you can start to use the ‘oc’ commands. I won’t provide an exhaustive list here, but some of the more useful examples are as follows:
- oc get projects – list available projects
- oc project <project name> – change project
- oc new project <project name> – create project
- oc get all – list all resources in current project
- oc get pods – list all pods in current project
- oc new-app <template> – create application
- oc scale <deployment-config> –replicas=x – scale application
As well as the basic stuff, ‘oc’ is also a great way to do some more obscure tasks, such as:
- port forwarding to allow temporary connectivity to a specific port within a pod;
- expose services in order to create a route if it hasn’t been created already;
- export a particular configuration (image stream, build config, deployment config, service or route), or all of it, as a YAML file.
Hypnotize
Once we’d covered the basics, we could start to have some fun with our applications: one of the most impressive aspects of OpenShift is the ease with which you can scale applications up and down. In the admin console, you have an image representing your application and the number of pods currently running.
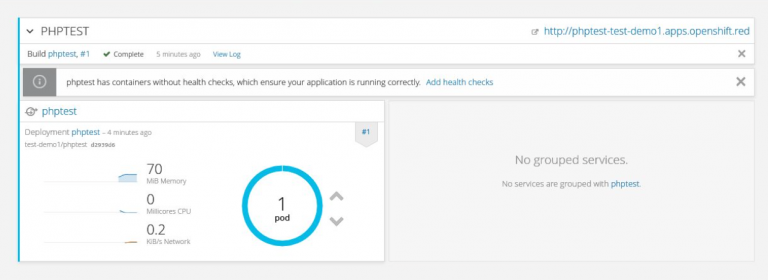
You can click the provided icons to increase or decrease the number of pods running the application, and because the exposed service is always available via its route, requests are automatically load balanced across the pods.
And in case you’re wondering, OpenShift uses a combination algorithm to determine load distribution, which includes anti-affinity (i.e. distributing across separate availability zones/hardware) and node utilization.
The optimum number of pods to run can form part of the application’s deployment configuration, so if one or more pods fail, OpenShift will automatically start up new ones until the required number are running. Magic!
Absolute
Pretty soon we were ready to start exploring some of the wider possibilities of OpenShift, such as wiring application components together, automating builds and deployment pipelines. Our first example of this was a ruby application that had a dependency on a MySQL database. So we created a project with 2 applications (one ruby, one MySQL) and used environment variables (db name, username, password etc.) which were replicated in both deployment configurations to manage the dependencies between the application and database components.
Another really cool feature that we saw was an automated build using a webhook. This is a simple URL available in Github, which you can copy into OpenShift to trigger an image build as soon as the code repository changes i.e. as soon as someone checks something in. I was able to check in a simple change, then saw my OpenShift image rebuild and re-deploy my application immediately.
This is great for dev environments, but obviously requires some control for test and production! So, to counteract that we also did a ‘pull’ deployment. This required us to set up multiple projects, each one representing a different stage of the project lifecycle (e.g. dev, test, prod etc.). We then configured one of the subsequent projects (e.g. ‘test’) to pull the image from dev, but only when that project was ‘tagged’ as being ready for testing – this is done very simply with the ‘oc tag’ command.
One thing we had to do to make this work was relax the security to allow the test project to pull its image from the dev project: as I’ve already mentioned, the default security model is to keep all projects completely separate from each other.
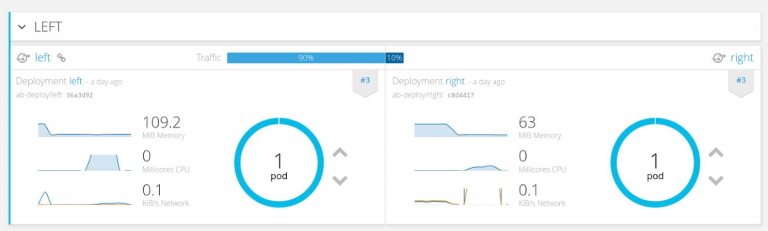
A final deployment example we looked at was the famed ‘A/B Deployment’, which allowed us to deploy a second version of an application while the previous version was still running. As part of this configuration, we were able to set the amount of traffic, as a percentage, to distribute to each version. Again, very cool!
Perfect Way
Towards the end of the PoC, we were able to go solo and create some applications of our own. One of the things I was particularly keen to try was a deployment of a pre-built web application (WAR file) where I did not have access to the source code. I also wanted to see how I could apply a customised standalone.xml configuration file in a JBoss EAP container.
In the end, both of these objectives were achieved quite simply:
- create a Git repository consisting of a dummy pom.xml;
- inside the repo, create a deployments directory and upload the WAR to it;
- inside the repo, create a configuration directory and upload the standalone.xml to it;
- use the JBoss EAP xPaaS image as the template, and the above repo as the source.
Again, without much effort, I was able to have my pre-built web application deployed to EAP with my customised configuration. Job done!
This led to a wider discussion on best practice, and how you might achieve certain objectives outside of the pre-canned options already offered by OpenShift. One way to create highly customised applications and configurations is to bake the whole thing into a Docker image, and then upload that image into the OpenShift Registry, but I can’t help feeling this is something of a sledgehammer approach. It certainly precludes any flexibility in the way you use that image.
I think there are more intelligent ways to build your containers, most notably by parameterising the build and deployment configuration files in OpenShift. Although we did a little of this in the PoC (see the previous database example), I didn’t really get to play with this as much as I’d have liked. If you’re serious about this, I’d recommend taking a closer look at YAML.
Oh Patti
Those of you who’ve read my previous posts will be familiar with my background as a JBoss middleware specialist. As such, I still have a few questions about OpenShift: the xPaaS container images differ somewhat from the pure middleware products, for example you have no access to the EAP admin console, and EAP domain mode isn’t supported. Then again, domain mode and clustering are concepts which are frankly redundant in the OpenShift world. You no longer need to worry about centralised management and configuration of application servers, and applications can be scaled so easily that there is no need to configure clustering or load balancing at the app server level.
The other thing that hit me during the PoC is that not all applications are right for OpenShift. I’ve been to quite a few OpenShift presentations recently, and not one of them has failed to mention the term ‘microservices’. It’s true that smaller, self-contained, stateless applications are a better fit, both in terms of managing dependencies and the ability to scale, than large, monolithic applications. Time will tell whether, and to what extent, organisations adopt the microservices development approach, but I think this is crucial to the wider adoption of OpenShift.
Looking further into the future, I can see OpenShift being hugely disruptive to both traditional virtualisation and disaster-recovery scenarios: if development teams can provision their own environments, distribute applications across physical data centres, and scale on demand, do you even need that stuff anymore?
Best Thing Ever
In conclusion, I personally got a lot out of this PoC. I certainly understand the product a lot better in terms of its core concepts and components, and I also got a lot of technical hands-on experience. But probably the most important thing I took away from the PoC is that OpenShift puts a totally new spin on ‘DevOps’: it’s not so much that you have developers taking over operations, rather it clarifies the responsibilities of operations and development teams:
- the ops team provisions the requisite compute/network/storage resources, using whatever combination of hardware, virtual, cloud they see fit;
- the dev team has the freedom to do what they want with those resources, and not be constrained by standard o/s builds or corporate-mandated application stacks.
This combination of developer freedom and operational control, and the fact that this can all be done in a completely secure way, is pretty compelling. For some, this might represent a change in mindset, and I certainly think organisations who are going to get the most out of OpenShift are those that are open to changing the way they currently do things. But if you are, the possibilities are pretty exciting!