Understanding Behaviour-Driven Development (BDD) Testing

In this post we will be discussing BDD Testing, touching on how this style of testing works, the benefits that it provides, and illustrating with an example.
Written by Hayden Eastwell, Software Developer at Tier 2 Consulting
What are BDDs?
Behaviour-Driven Development (BDD) Testing, often referred to as just “BDDs”, is a style of testing that focuses on validating the behaviour of the target system. Behaviours are acknowledged using Given-When-Then acceptance criteria, such as:
- “Given the database contains a valid Customer record, when a request for this Customer is sent to our application, then the application will retrieve the matching record and send it to the client application”
- “Given the customer has enough money in their bank account, when they submit an online order, then the monetary cost will be deducted from their bank account”
It’s with this criterion that a developer and client may agree on the expected functionality for the final product. Throughout the development process, developers will ensure it works by replicating these behaviours in test scenarios, which can range from covering a single unit of the final product or an integration of many units.
How Are They Useful?
Collaboration between Stakeholders and the Development Team
When establishing requirements from example behaviours, stakeholders and developers can collaborate on producing cases that need to be evaluated during the development stage. In addition to providing targets for the development team to achieve, it allows stakeholders to easily understand the test cases, reducing barriers for feedback and ensuring wanted scenarios are covered.
Use of Natural Language Aids Accessibility
With many frameworks employing the use of natural language for outlining test steps, it is easier for non-technical individuals to understand what is happening and, with reusable steps defined, contribute to the specifications – reducing the dependency on developer resources. In addition, the easier understanding paves the way for enhanced feedback from stakeholders.
Validating the Behaviour of the Solution
Throughout the development process, it is important to run through tests as new features are introduced and developed. With tests that are aligned with the requirements of the project, it is easier to maintain the project’s alignment with the end goal. This benefit will apply throughout the whole of the development, providing security that the stakeholder requirements will be met.
Improving the Development Pipeline
The nature of many test frameworks is that test specifications are designed to be automated. With this in mind, build pipelines such as CI/CD (Continuous Integration; Continuous Delivery) can incorporate running test suites prior to building any deliverables, failing those builds if tests fail. It’s with this practice that the dependency on manual testing to cover all behaviours is reduced.
How are BDDs Implemented?
There are many frameworks available, each providing its own benefits to complement your workflow. These include:
- Cucumber – A framework available for multiple languages, using ‘Gherkin’ syntax to describe the order of steps for specifications in plain language
- Spock – A specification framework that enables the use of plain language for labelling specifications and an organisation of test steps into Given, When and Then clauses
- Concordion – A framework for creating ‘living documentation’, consisting of plain language Markdown documents that are used for both documenting and testing your application
Demo: Using Cucumber to Test a Spring Boot Service
To illustrate how BDD Tests are produced, consider this example of using Cucumber to test a Spring Boot service. In this service, we have a UserController that employs a JPA Repository to communicate with an embedded H2 database. With this controller, there are two exposed endpoints for clients to interact with:
- GET Endpoint, for retrieving a User from the database
- POST Endpoint, for creating a User to add to the database
Within these tests, HTTP requests are sent to these endpoints, and the application’s behaviour is evaluated. Let’s walk through how this project is set up.
Dependencies
For this project, which is targeting Java 21, we have chosen the Spring, JUnit and Cucumber packages for the application and test suite:
implementation("org.springframework.boot:spring-boot-start-data-jpa")
implementation("org.springframework.bot:spring-boot-starter-web")
implementation("com.h2database:h2")

testImplementation("com.springframework.boot:spring-boot-starter-test")
testImplementation("com.google.code.gson:gson:2.11.0")
testImplementation("io.cucumber:cucumber-java:7.18.0")
testImplementation("io.cucumber:cucumber-spring:7.18.0")
testImplementation("io.cucumber:cucumber-junit:7.18.0")
testImplementation("org.unit.vintage:junit-vintage-engine:5.10.3")

testRuntimeOnly("org.junit.platform:junit-platform-launcher:1.10.3")
Test Runner Configuration
Once the dependencies are ready, the test runner class must be configured to allow Cucumber to run the tests and establish where the ‘Feature’ files will be found (more on that later). To do so, class ‘SpringBootCucumberApplicationTests’ is annotated with:
@RunWith(Cucumber.class)
@CucumberOptions(
    plugin = { “html:build/cucumber-report.html” }
    features = “src/test/resources”
)
The @RunWith annotation is used to tell JUnit to run with Cucumber, and @CucumberOptions states the plugins to use, being an HTML output of test runs in the build directory, and a pointer to where features are stored.
With the test runner configured, the ‘Context Configuration’ comes next. This is necessary for the test suite to start up with the Spring Boot context. In CucumberSpringContextConfiguration.java, the class is annotated with:
@SpringBootTest(
    classes = SpringBootCucumberApplication.class,
    webEnvironment = SpringBootTest.WebEnvironment.DEFINED_PORT
)
@CucumberContextConfiguration
@DirtiesContext
- The statement webEnvironment = SpringBootTest.WebEnvironment.DEFINED_PORT tells Spring to start the application with the Tomcat server running, so that the application will listen to HTTP requests from the testbed
- The CucumberContextConfiguration is a required annotation and will inform Cucumber that this class is responsible for additional configuration applied to Cucumber’s context throughout this test suite
- With the @DirtiesContext annotation, the Spring context is set to restart the application after each test, thus re-creating the in-memory H2 database. This is important for making sure that the state of the database after the current test case does not affect others
Writing Your First Step Definition
Now that the runner and context configurations are in place, the next step is to define steps to use in the tests. One of Cucumber’s features includes reusable test steps, which will be defined in Java for this case.
The best practice for writing these methods is to combine tasks within a given domain (e.g. Database or HTTP operations) into their own classes, and Cucumber provides annotations to declare methods of these classes that are registered as ‘step definitions’.
@Given(“I insert a User record with the following fields”)
@And(“I insert a User record with the following fields”)
@But(“I insert a User record with the following fields”)
@When(“I insert a User record with the following fields”)
@Then(“I insert a User record with the following fields”)
These annotations each work the same as one another, and only differ in name to help identify the point of a test case that they would be suited for. For example, the insertRecordWithFields method in the DatabaseStepDefs class uses a Given annotation:
@Given(“I insert a User record with the following fields”)
public void insertRecordWithFields(DataTable table) {
    Map<String, String> asMap = dataTable.asMap();

    User savedUser = userRepository.save(new User(
        null,
        asMap.get(“username”),
        asMap.get(“password”)
    ));

    LOG.info(
        “Successfully saved user record with fields: ID: {}, Username: {}, Password: {}”,
        savedUser.getId(), savedUser.getUsername(), savedUser.getPassword()
    );
}
The actions taken in this method are:
- Taking a set of fields and values from a DataTable instance, which will be defined in ‘feature’ files that use this step – this will be covered later
- After converting the provided fields and values into a Map, provide a new User object for saving via the UserRepository
- For debugging/transparency, log the result (which will be provided with a new id field)
Using Your Step Definitions
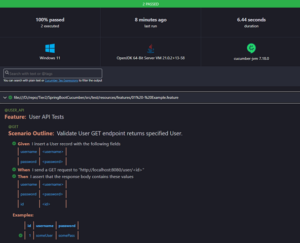
In Cucumber projects, test specifications are defined with ‘Feature’ files. These are files where Gherkin syntax is used to outline the specifications, using the steps that have been defined in the Java classes. Let’s look at one of the scenarios in 01 – Example.feature.
This example combines steps defined in DatabaseStepDefs.java and HttpStepDefs.java to produce a scenario for testing that the GET endpoint for the User API responds with the correct database entry.
@USER_API
Feature: User API Tests

  @GET
  @DirtiesContext
  Scenario Outline: Validate User GET endpoint returns specified User.

    Given I insert a User record with the following fields
      | username | <username> |
      | password | <password> |

    When I send a GET request to “http://localhost:8080/user/”

    Then I assert that the response body contains these values
      | username | <username> |
      | password | <password> |
      | id       |  <id>      |

  Examples:
    | id | username | password |
    | 1  | someUser | somePass |
Here’s a breakdown of how this has been written:
This statement declares a group of scenarios for a given topic, which has been assigned a name of “User API Tests”. This is annotated with @USER_API as a tag, that will tell Cucumber to run tests under this Feature if we filter with ‘@USER_API’
@USER_API
Feature: User API Tests
The Scenario Outline statement declares the start of the first test case, which has been tagged with @GET to tell Cucumber to run this test when filtering for ‘@GET’ instances and has been titled with an outline of the test scenario.
@GET
Scenario Outline: Validate User GET endpoint returns specified User.
Using the Given keyword, the first test step is called as declared with the expression defined in the @Given annotation of DatabaseStepDef’s insertRecordWithFields method. As this method is expecting a DataTable, one is provided with username and password fields and the values have been substituted with respective <username> and <password> variables, defined below.
Given I insert a User record with the following fields
  | username | <username> |
  | password | <password> |
Using the When keyword, call one of HttpStepDefs’s methods. In this method, the String parameter url aligns with the {string} in the @When annotation, and references the <id> variable so that this request may be adjusted to the id provided in the Examples statement.
When I send a GET request to “http://localhost:8080/user/”
Using the Then keyword, the evaluateCurrentResponse method is called for making assertions against the response JSON from the previous step. The expected values are passed via the DataTable and converted to a Map for the comparison.
Then I assert that the response body contains these values
  | username | <username> |
  | password | <password> |
  | id       |   <id>     |
The Examples statement is used to provide a table of example values that can be used in this sequence of steps. Examples can include many rows of values, though each set will need to support the same pattern of steps as the values currently present.
Examples:
  | id | username | password |
  | 1  | someUser | somePass |
Running Your Tests
Now that the tests are defined, you can now get to running them! Fortunately, you can simply invoke Gradle’s test command and wait for a few seconds. By default, these tests will run with the default properties defined in application.properties.
./gradlew test
Because the configuration enabled an output report for the tests, an HTML report can be found under build/cucumber-report.html.
Conclusion
In this post, we have described BDD tests that focus on the behaviour of a system, and that they can prove to be useful for:
- Collaboration between stakeholders and developers
- Their use of natural language promotes accessibility and readability
- Validating the behaviour of an application against the project requirements
- Improving the development pipeline with repeated testing and reduced dependence on test resources
We have also illustrated how BDDs can be constructed with Cucumber and Spring Boot. Check out our GitHub repository to play around with it for yourself!
How can Tier 2 help?
At Tier 2, we specialise in delivering high-quality custom software solutions and comprehensive testing services. Whether you’re focusing on Behaviour Driven Development (BDD), automation, or other testing strategies, our expert team ensures your software meets the highest standards.
Talk to Tier 2 today to see how we can support your software development and testing needs, driving your digital initiatives forward.