CIAM for Java applications using Azure AD B2C

Project Background
Tier 2 has been working closely with Ed Broking – a global wholesale insurance and reinsurance broker – to develop TradEd, an award-winning digital platform for the insurance industry:
Digital Transformation in action
Based on Red Hat JBoss EAP, and running on the Azure platform, the application originally allowed Ed employees to authenticate using their internal Active Directory credentials; with specifically invited external users authenticating via custom functionality.
We have recently consolidated all TradEd authentication with Azure Active Directory – using Microsoft’s Active Directory Authentication Library (ADAL), and Azure Active Directory B2C (Azure AD B2C) for customer identity access management (CIAM).
Tier 2’s Head of Software Development, Paul Thorp, explains how it was done:
Working with Azure Active Directory
In this post we will focus on the Azure AD B2C integration. I will not regurgitate how to setup the required Azure account, Azure AD B2C tenant and register the Azure applications, as this is covered well in the Microsoft documents (Azure Active Directory B2C documentation).
Microsoft have provided a number of methods in which to guide the customer identity experience, through the use of:
- standard User Flows, which are predefined in the Azure AD B2C portal for the most common identity tasks, and
- Custom Policies, via the Identity Experience Framework (IFE), which are configuration files that define the behaviour of your Azure Active Directory B2C (Azure AD B2C) tenant.
Custom Policies are basically XML files that can be fully edited and uploaded into the IFE by a developer or identity manager to complete many different tasks and there are 3 main policy files:
- TrustFrameworkBase.xml, the base file that contains most of the definitions and generally is not edited
- TrustFrameworkBaseExtensions.xml file, the extension file that contains your custom config
- Relying Party file, a single task-focused file, e.g. SignIn.xml
Again, more information on the custom policies can be found in the Microsoft docs (Azure AD B2C custom policy overview). However, I will explain a little about how we used these as part of the Sign-in experience.
Our Approach
There are many ways we could have approached the authentication and generation of our application token (JWT) using Custom Policies, ADAL and our backing services. After much thought, we decided to use the Custom Policies to perform a callback to our own security services, in order to generate the application JWT and return as part of the token from the Azure AD B2C authentication.
As we require the application JWT to be returned from the Azure AD B2C response, we added the attribute called ‘serviceToken’ into the IFE extensions file as a new ClaimType within the ClaimsSchema of the core BuildingBlocks element.
<ClaimType Id="serviceToken">

  <DisplayName>serviceToken</DisplayName>

  <DataType>string</DataType>

  <UserHelpText>Services JWT</UserHelpText>

</ClaimType>
Next a new RP file called SignIn.xml was created. We then referenced this as part of the SignIn user journey and defined the new OutputClaim for the serviceToken.
<RelyingParty>

  <DefaultUserJourney ReferenceId="SignIn" />

  …

  <OutputClaims>

   …

   <OutputClaim ClaimTypeReferenceId="serviceToken" />

</OutputClaims>
Finally, a new ClaimsProvider was added to the extensions file. Within this we defined a TechnicalProfile and configured various elements, including the input/out claims and the external service URL of our security service. For brevity I have left out a number of elements in the example below, but it should be noted that within the Metadata section you can choose to use an authentication type, such as BasicAuth or a ClientCertificate.
<ClaimsProvider>

  <DisplayName>SignIn REST APIs</DisplayName>

  <TechnicalProfiles>

    <!-- Custom Restful service -->

    <TechnicalProfile Id="REST-API-SignIn">

      <DisplayName>Validate user's input data and return JWT claim</DisplayName>

      …

      <Metadata>

        <Item Key="ServiceUrl">https://{backing_service_URL}/identity/signin</Item>

        ..

      </Metadata>

      …

      <InputClaims>

        <InputClaim ClaimTypeReferenceId="signInName" PartnerClaimType="email" />

        <InputClaim ClaimTypeReferenceId="givenName" PartnerClaimType="firstName" />

        <InputClaim ClaimTypeReferenceId="surname" PartnerClaimType="lastName" />

      </InputClaims>

      <OutputClaims>

        <OutputClaim ClaimTypeReferenceId="email" PartnerClaimType="email" />

        <OutputClaim ClaimTypeReferenceId="serviceToken" PartnerClaimType="serviceToken" />

      </OutputClaims>

      …

    </TechnicalProfile>
Directly after this first TechnicalProfile we created another with the specific identifier of ‘SelfAsserted-LocalAccountSignin-Email’. This profile simply sets the output claim and references our first technical profile, from above, for use in the validation phase of the claims exchange.
  <TechnicalProfile Id="SelfAsserted-LocalAccountSignin-Email">

      <OutputClaims>

        <OutputClaim ClaimTypeReferenceId="serviceToken" PartnerClaimType="serviceToken" />

      </OutputClaims>

      <ValidationTechnicalProfiles>

        <ValidationTechnicalProfile ReferenceId="REST-API-SignIn" />

      </ValidationTechnicalProfiles>

    </TechnicalProfile>

</ClaimsProvider>
This is an override of another TechnicalProfile of the same identifier name that is pre-defined in the base IFE file, and used in the SignIn phase of the main UserJourney definitions.
<UserJourney Id="SignIn">

  <OrchestrationSteps>

    <OrchestrationStep Order="1" Type="ClaimsExchange">

      <ClaimsProviderSelections>

        <ClaimsProviderSelection ValidationClaimsExchangeId="LocalAccountSigninEmailExchange" />

      </ClaimsProviderSelections>

      <ClaimsExchanges>

        <ClaimsExchange Id="LocalAccountSigninEmailExchange" TechnicalProfileReferenceId="SelfAsserted-LocalAccountSignin-Email" />

      </ClaimsExchanges>

      …
So, what exactly does this do?
Basically, the ADAL function from our B2C login button on our web app redirects the user to the Azure B2C login. After the user has successfully authenticated as a B2C user the Azure AD B2C claims exchange performs a REST call to our security endpoint that validates the user and returns our application JWT (or appropriate error) that will be used for all calls made by the Angular application. The Azure AD JWT is returned with the user claims, including our serviceToken, which we process to provide access to the application.
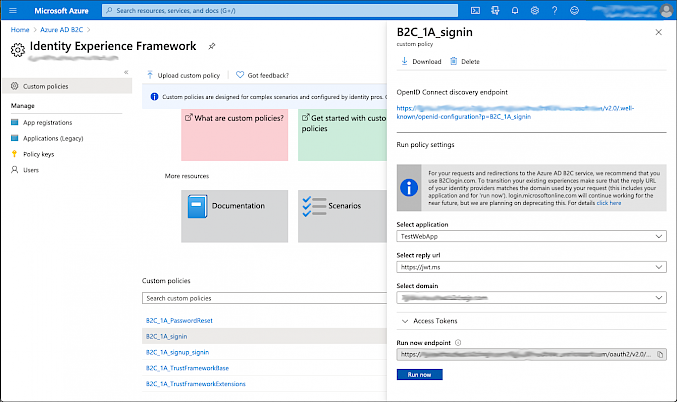
Testing our custom policies
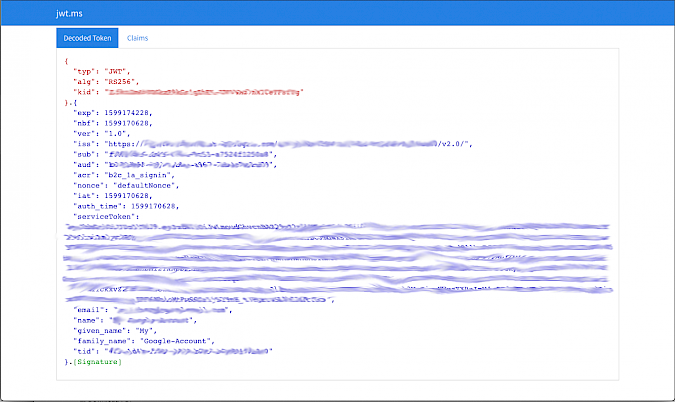
With this all in place and uploaded into the IFE, we are able to start using this inside the application, but before we do it would obviously be great to validate that this is working as we expect. Luckily, we are able to do that from the IFE page. Any Custom Policy can be tested within the Azure portal by simply clicking on the name of the policy, choosing an appropriate application and reply URL, then clicking the “Run now” button. Defining a reply URL of https://jwt.ms allows the returned JWT to be shown in the Microsoft JWT decoder page, which can be useful for testing.
Here, we can see that our custom policy has been called during the sign in and we have a serviceToken returned as part of the AD B2C authentication.
What next ?
Now that we have the Custom Policies setup and validated as working, we are able to implement the ADAL into our web-app. However, we will leave this for now and cover in another post.