Angular Development: with Google reCAPTCHA
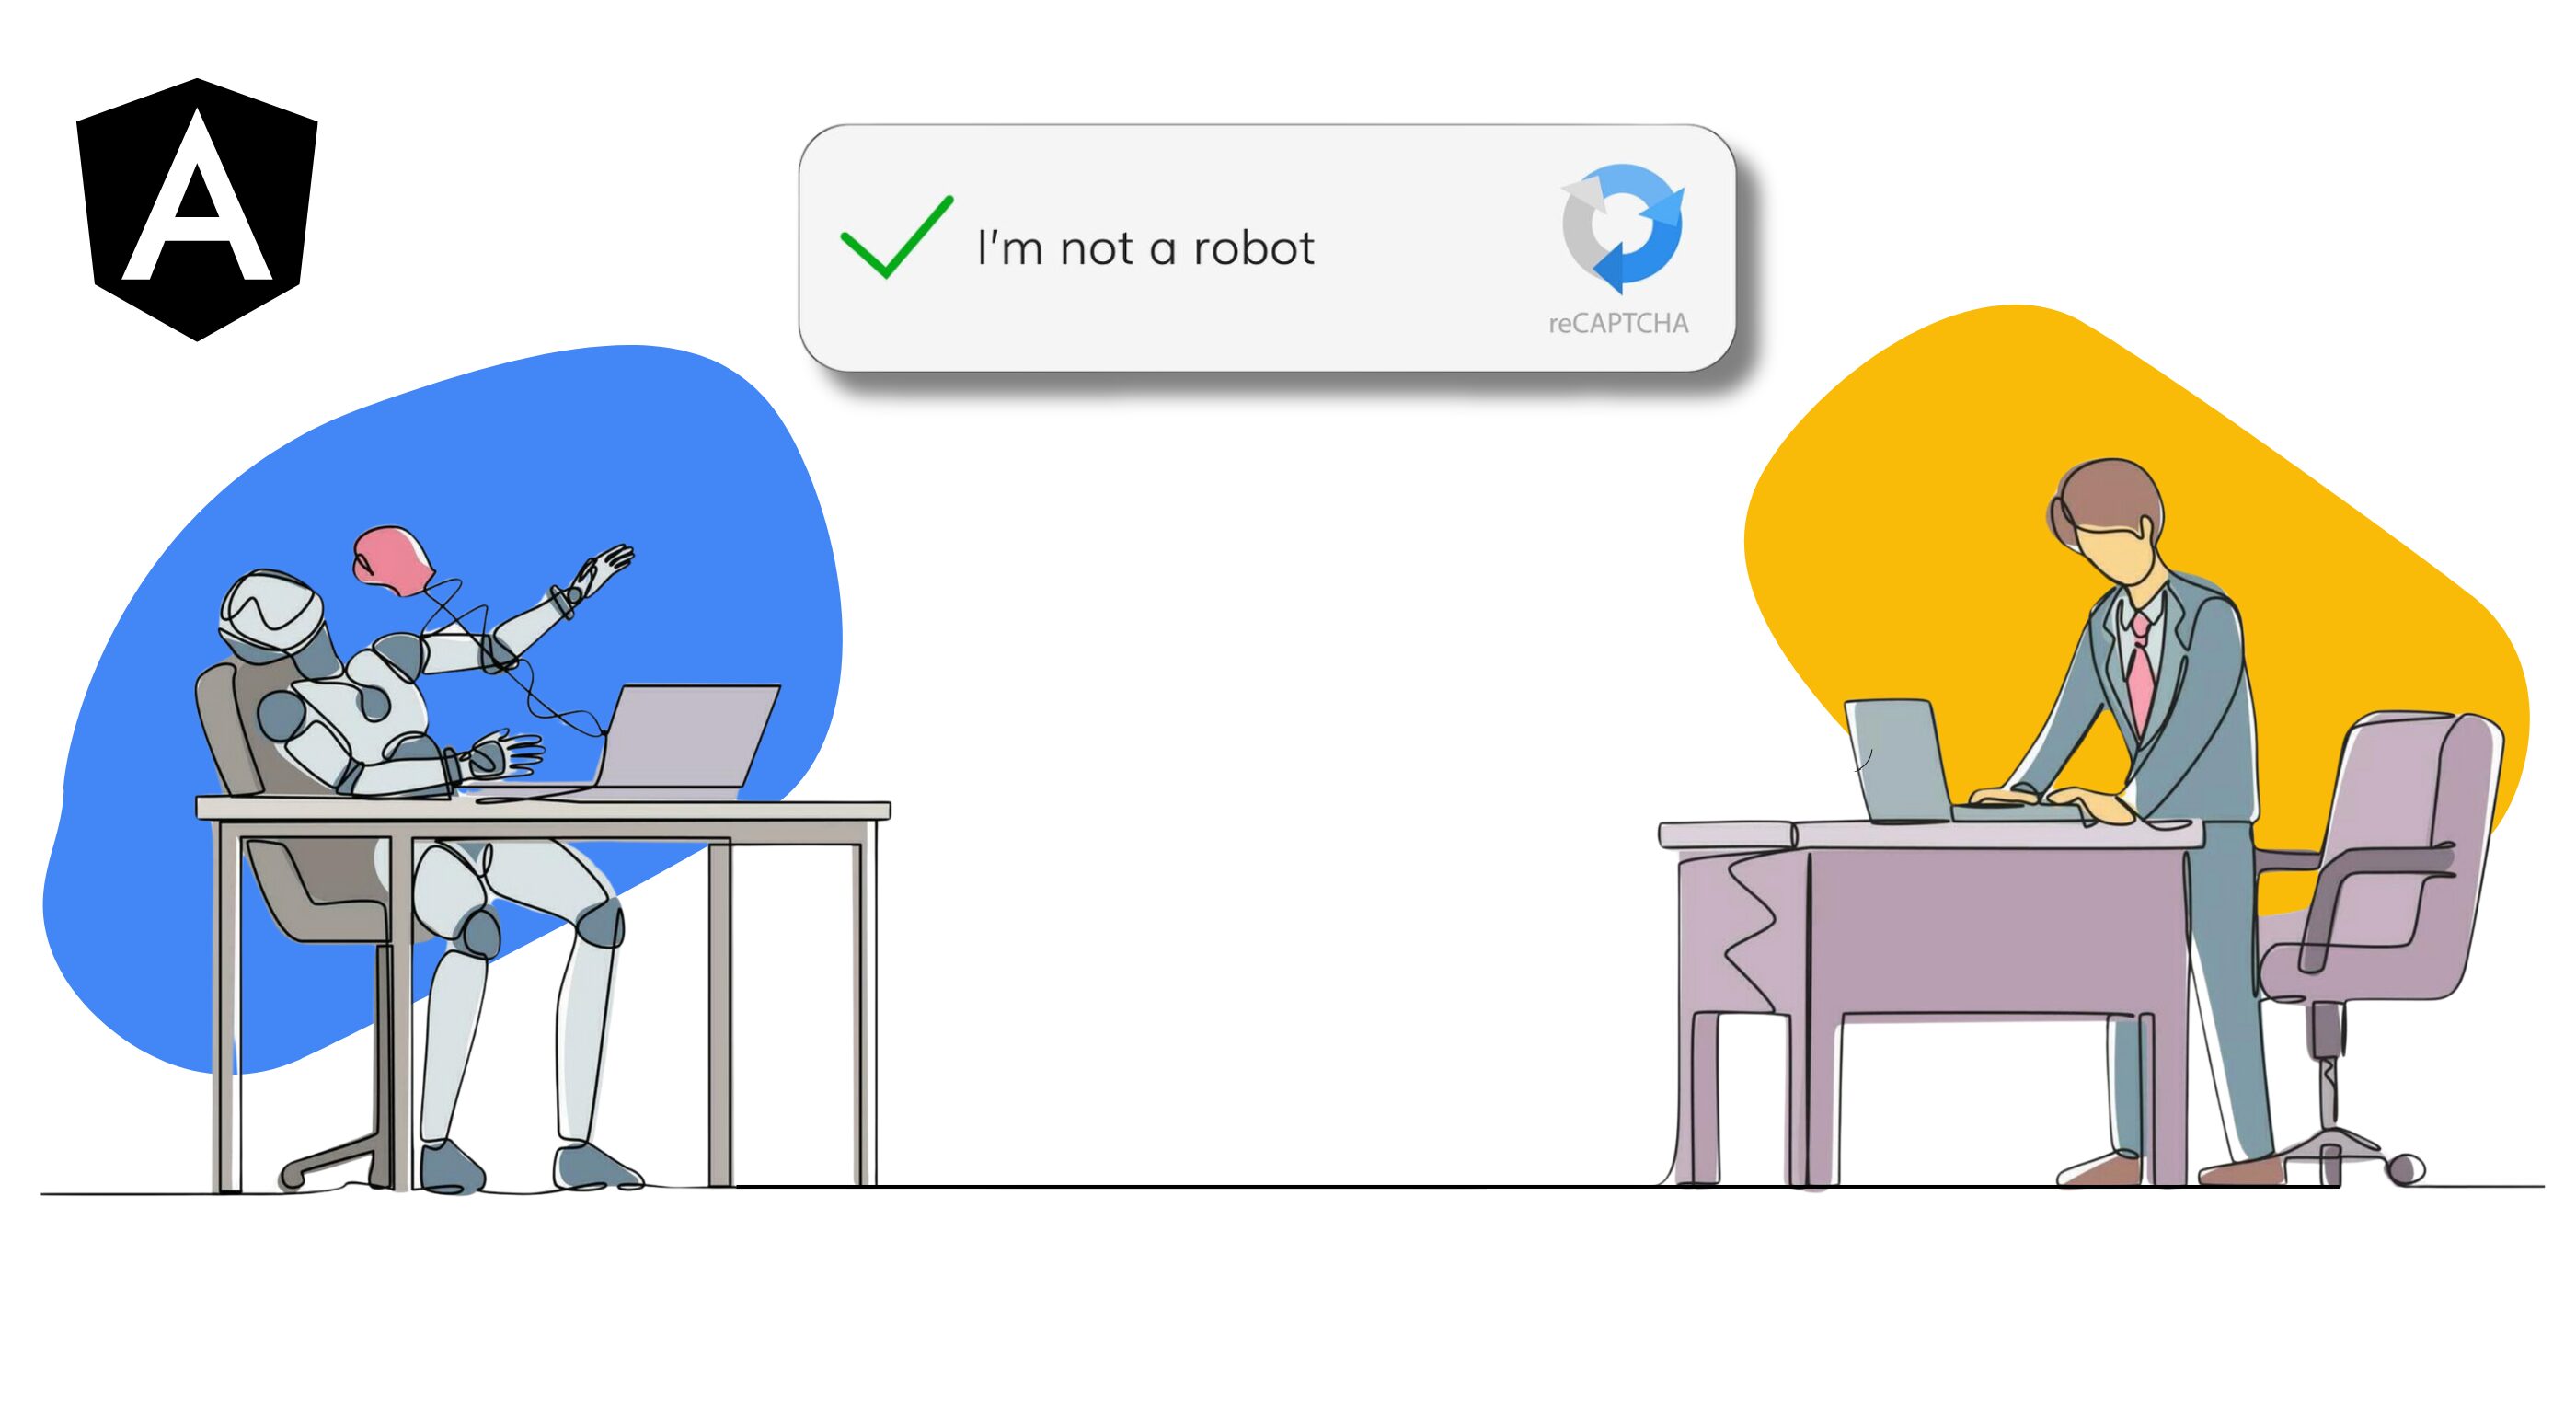
Join us as we demonstrate one way to add Google’s reCAPTCHA v3 to an Angular application with backend service.
Looking for expert assistance in software development? Discover how Tier 2’s custom software solutions can elevate your digital initiatives. Talk to Tier 2 for a bespoke software solution leveraging industry-standard Java technologies, agile development, and user-centric design.
Written by Dan Bennett, Head of Software Development
What is (re)CAPTCHA?
CAPTCHA (Completed Automated Public Turing test to tell Computers and Humans Apart) is a challenge-response based security measure. It is one of the most commonly used tools employed to ensure that the user interacting with a webpage or form is actually human and not a bot.
reCAPTCHA is a Google implementation of CAPTCHA and is widely used across the industry. It has undergone a few changes since its first implementation in the early 2000s: the latest version 3 from Google aims to minimise interruption to the user’s journey by using a score-based system to determine if the user is a bot or human.
How does it work?
Previous CAPTCHA versions would present challenges designed to be solvable by humans but difficult or impossible for bots. These challenges included:
- Recognising blurred or distorted fragments of text
- Identifying certain elements of one or more images
- Tracking cursor movement with a checkbox to check for humanlike webpage interaction
Google reCAPTCHA version 3 works by analysing several factors within the users browser including cursor movement, site interaction and browser score. These factors are combined into a score ranging between 0.0 and 1.0 where 1.0 is most likely to be human. This score is analysed by the site and appropriate action is taken. For example, if a user was to score under 0.7 then the site may display a challenge, or request a one-time password (OTP) sent to their email address or phone number etc.
Continue to the next section to see an example of how this could be implemented in your application.
Try It!
In this section we’re going to create a simple Angular application including a registration form to demonstrate how to use reCAPTCHA version 3, protecting it from bots.
We’ll also configure reCAPTCHA in our Google Console and setup a back-end service to validate the reCAPTCHA token and determine the user’s score.
Prerequisites
You must have Node JS and NPM installed and have a basic knowledge of using them. It would also be beneficial to have a working knowledge of Angular.
If you’re new to Angular please see this guide to get you started.
Note: If you’re short on time or you’d rather just see a finished version to play with, you can check out this example from GitHub. However, we do recommend following along with the next section, particularly if you’re relatively new to Angular 17.
Setup
The first step is to install the Angular CLI on your environment as we’ll be using this to generate our initial components.
npm i -g @angular/cli@17
Setup a new project
Now we’re ready to begin creating our project, start with `ng new` to create the initial project and name it angular-recaptcha choosing these options:
ng new angular-recaptcha
> Which stylesheet format would you like to use? Sass
> Do you want to enable Server-Side Rendering (SSR) and Static Site Generation (SSG/Prerendering)? No
Once the Angular CLI has finished setting up your new project, continue to the next section to setup the initial project structure.
Create the project structure
Use the Angular CLI and the following code snippets to setup an initial registration form ready to use reCAPTCHA.
Model
Run this CLI command to setup a model class for our Angular form implementation:
ng g class models/registration-form
Edit the models/registration-form file and insert the following code to represent our form:
import { FormControl } from '@angular/forms';

export declare class RegistrationForm {
    email: FormControl<string | null>;
    password: FormControl<string | null>;
    recaptcha: FormControl<string | null>;
    acceptTerms: FormControl<boolean | null>;
}
Service
Next, we need to create a service to communicate with our backend microservice. Run this CLI command to setup the service class we’ll need to actually register our user.
ng g service core/services/register
Edit the core/services/register/register.service.ts file and add the following function. For this example we’ll just use the browsers built-in fetch functionality to perform our REST request:
async send(request: any): Promise<boolean> {

    const response: Response = await fetch(
        'https://localhost:8080/register',
        {
            method: 'POST',
            mode: 'cors',
            headers: {
                'Content-Type': 'application/json'
            },
            body: JSON.stringify(request)
        }
    );

    if (response.ok) {
        return response.json();
    }
    throw Error(`Error registering user! ${response.statusText}`);
}
Component
Run this CLI command to create our register component, this component will handle interaction with the user:
ng g component features/register
Edit the features/register/register.component.ts file to initialise the above form on load:
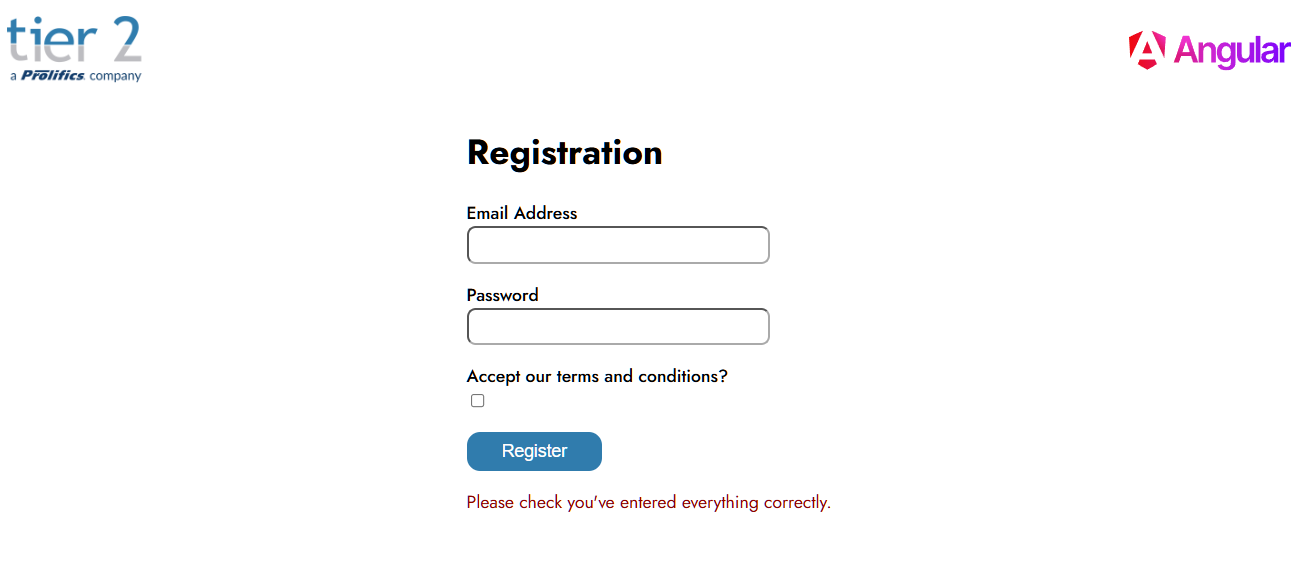
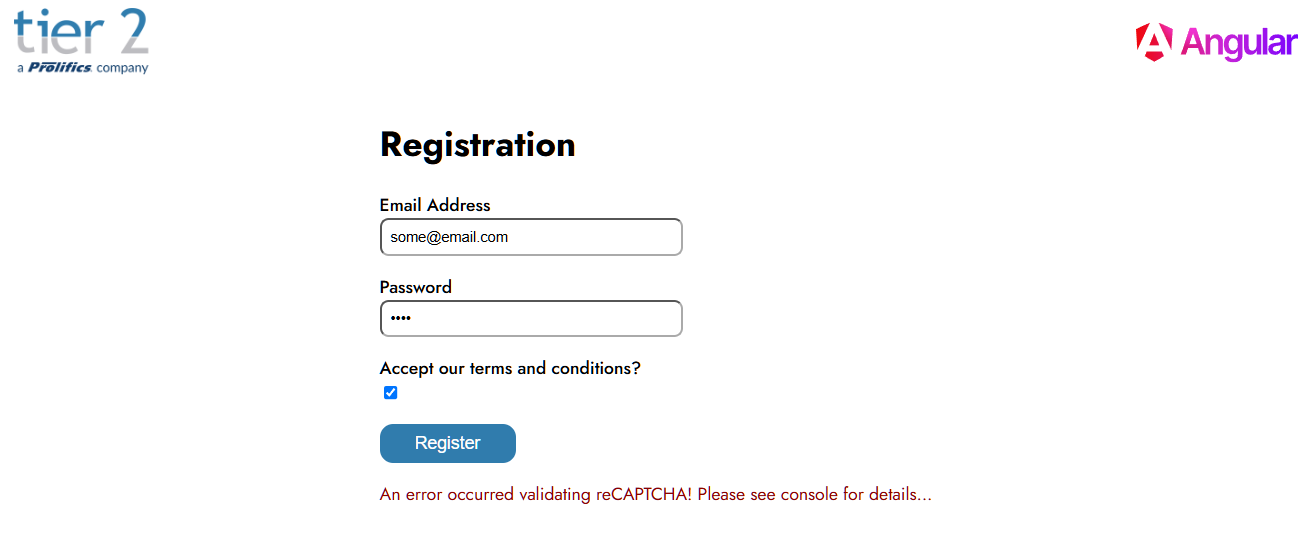
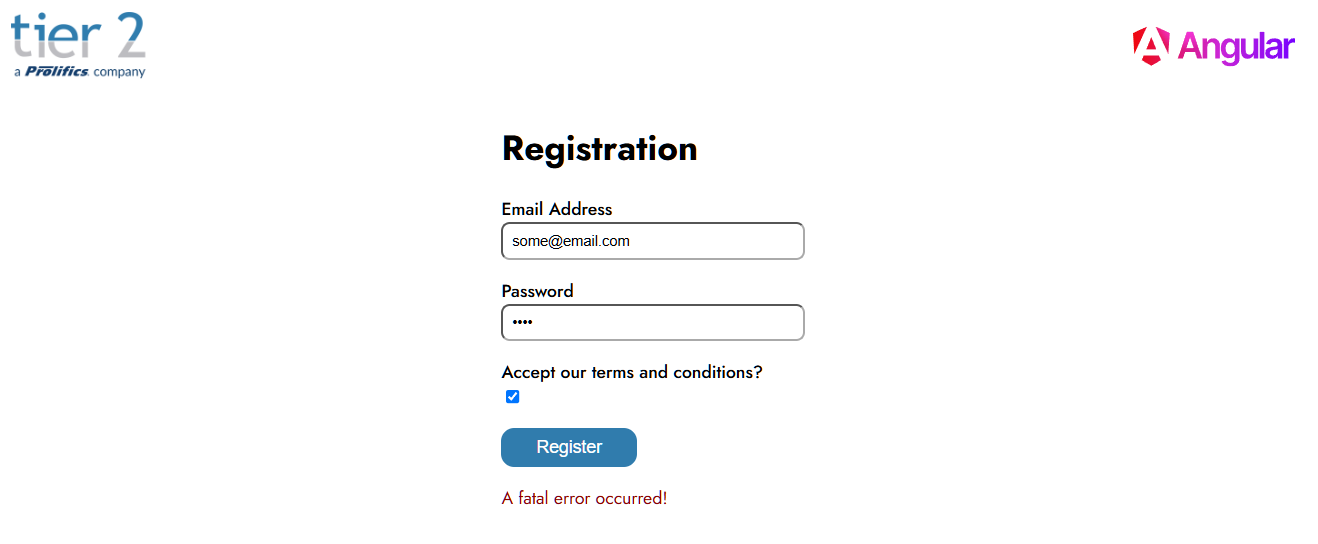
@Component({
    selector: 'app-register',
    standalone: true,
    imports: [
        ReactiveFormsModule,
    ],
    templateUrl: './register.component.html',
    styleUrl: './register.component.sass'
})
export class RegisterComponent implements OnInit {

    form: FormGroup<RegistrationForm> | undefined;
    // For demo purposes
    errors: any = {
        form: 'Please check you\'ve entered everything correctly.',
        captcha: 'An error occurred validating reCAPTCHA! Please see console for details...',
        fatal: 'A fatal error occurred!'
    }
    error: string | null = null;
    registered: boolean = false;

    ngOnInit(): void {
        this.form = new FormGroup<RegistrationForm>({
            email: new FormControl<string | null>(null, Validators.required),
            password: new FormControl<string | null>(null, Validators.required),
            recaptcha: new FormControl<string | null>(null, Validators.required),
            acceptTerms: new FormControl<boolean>(false, Validators.requiredTrue)
        });
    }
}
In this example we’ll use the `error` field to display appropriate information to the user and a simple boolean `registered` flag to indicate everything went well. In a real-world scenario this would be handled more elegantly.
Next, add a function named registerUser() to trigger the user registration:
registerUser(): void {
    console.debug(`[sendRegistration]::Registering user ${this.form?.controls.email.value}`);

    if (!this.form?.valid) {
        this.error = this.errors.form;
        return;
    }

    this.registerService.send(this.form.value)
        .then((res) => {
            if (!res) {
                console.warn('[registerUser]::Failed reCAPTCHA!'');
                this.error = this.errors.captcha;
            } else {
                console.debug('[registerUser]::User registered!');
                this.registered = true;
            }
        })
        .catch((err) => {
            console.error(`[registerUser]::Error registering!`);
            this.error = this.errors.fatal;
        });

}
This function uses the RegisterService class to invoke user registration by sending the form as a JSON request and then printing the success or failure based on a flag returned from the server. In this example we’ll keep it simple and utilise the errors and registered flag we added earlier to display the appropriate response. These are used as follows:
- registered :: all is well, CAPTCHA passed and user registered
- errors.form :: form is invalid i.e. wrong email format or field(s) not completed
- errors.captcha :: request was successful but the CAPTCHA failed, user not registered
- errors.fatal :: a fatal error occurred, for example a networking issue or similar
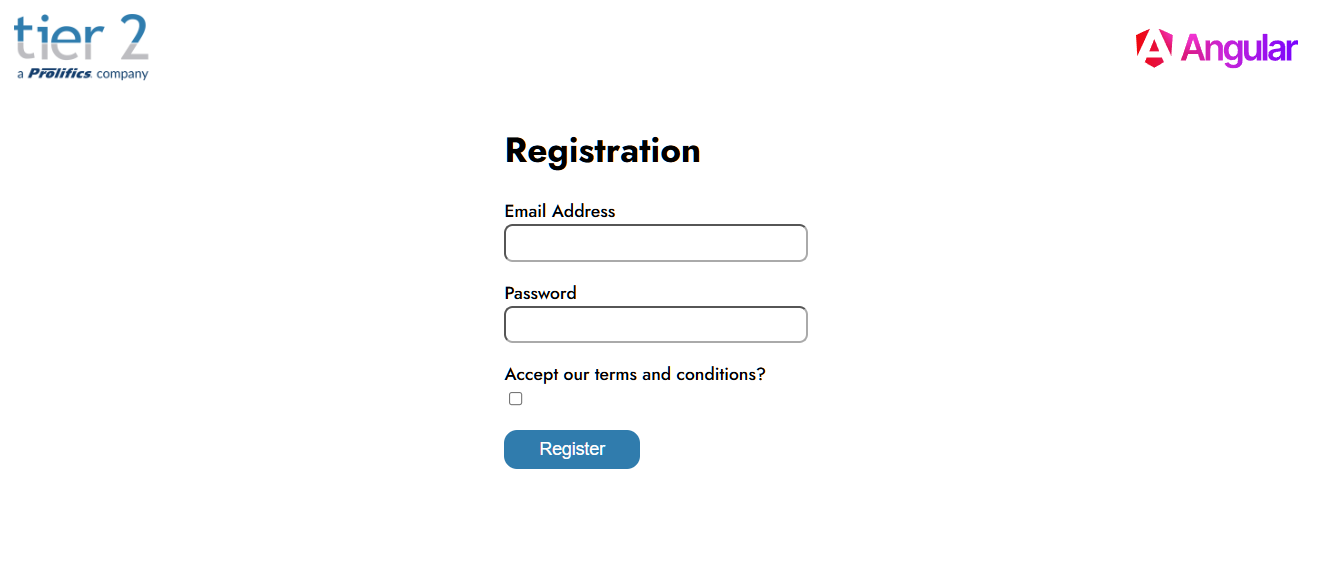
Next let’s add a basic form to our markup, edit the features/registration/registration.component.html file and add:
<h1>Registration</h1>

<div id="registration-form">
  @if (!registered) {
    <form [formGroup]="form!">
      <div class="field">
        <label>Email Address</label>
        <input type="text" formControlName="email" />
      </div>
      <div class="field">
        <label>Password</label>
        <input type="password" formControlName="password" />
      </div>
      <div class="field">
        <label>Accept our terms and conditions?</label>
        <input type="checkbox" formControlName="acceptTerms" />
      </div>
      <button type="submit" (click)="validateForm()">Register</button>
    </form>
  }

  @if (error) {
    <p class="error">{{ error }}</p>
  } @else if (registered) {
    <p class="success">Form completed successfully!</p>
  }

</div>
As you can see, we’re rendering the form with the state (error or registered) at the bottom.
Finally, add some simple styles to features/register/register.component.sass:
.error
  color: darkred
.success
  color: darkgreen
form
  label
    display: block
    font-weight: 500
    margin-top: 1rem
  input[type="text"], input[type="password"]
    border-color: #aaa
    border-radius: 0.5rem
    padding: 0.5rem
    width: 16rem
  button
    background-color: rgb(48, 124, 173)
    border: 0
    border-radius: 0.75rem
    display: inline-block
    color: white
    cursor: pointer
    font-size: 16px
    font-weight: 500
    outline: 0
    min-height: 28px
    margin-top: 1rem
    padding: 8px 32px
Setup reCAPTCHA
Now that we have our project ready, we’ll need to setup reCAPTCHA in a Google Account. If you don’t have a Google account then you can sign up for free to give this a try.
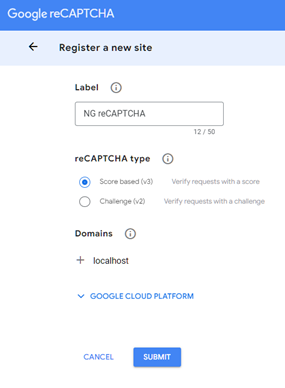
Once logged in, navigate to the reCAPTCHA console (https://www.google.com/recaptcha/) and select v3 Admin Console from the menu.
On the next page, select the + to add a new reCAPTCHA and enter your details as below using your own domain: for this example we’ll just use localhost:4200:
Click the Submit button to proceed
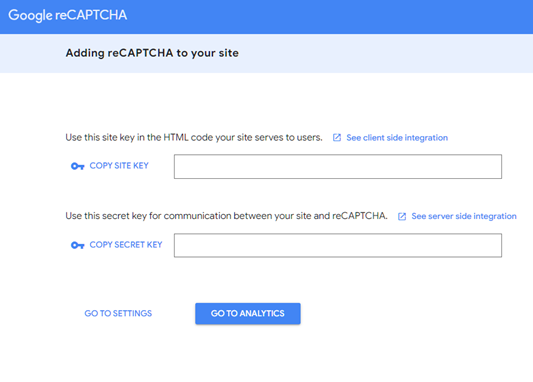
Copy your site and secret keys and keep them somewhere safe and secure as you’ll need these later.
Now you’re ready to add reCAPTCHA to your new application.
Add Google reCATPCHA v3 to your application
Start by adding the ng-recaptcha (https://www.npmjs.com/package/ng-recaptcha) library to the application to make the process a little easier:
npm i --save ng-recaptcha
Next edit the app.config.ts file to add a provider for the reCAPTCHA site key and replace ‘YOUR_SITE_KEY’ with the key you generated in the previous section:
export const appConfig: ApplicationConfig = {
    providers: [
        provideRouter(routes),
        {
            provide: RECAPTCHA_V3_SITE_KEY,
            // ***** WARNING ******
            // Load this dynamically in a production environment, never hard code it!
            useFactory: () => 'YOUR_SITE_KEY'
            // ********************
        }
    ]
};
Next edit the features/login/login.component.ts file to provide the recaptcha site key and import the RecaptchaV3Module from ng-recaptcha.
@Component({
...
    imports: [
        RecaptchaV3Module,    // <- add this,
        RecaptchaFormsModule, // <- this,
        RecaptchaModule       // <- and this
    ],
...
})
export class RegisterComponent implements OnInit, OnDestroy // add this too
 {
Note: in this example we are hardcoding our keys but don’t do this in production! These keys should be loaded from a secure source.
Import the RecaptchaV3Service into the RegisterComponent:
private recaptchaService: ReCaptchaV3Service = inject(ReCaptchaV3Service);
And add a reference to a subscription so that we can unsubscribe later:
recaptchaSub: Subscription | undefined;
Then implement OnDestroy to unsubscribe from our recaptchaSub when the component is removed:
ngOnDestroy(): void {
    this.recaptchaSub?.unsubscribe();
}
Next we add a function named validateForm(), that we’ll use to invoke the initial reCAPTCHA before triggering registerUser():
validateForm() {
    this.error = null;
    this.registered = false;
    this.recaptchaSub = this.recaptchaService.execute('register').subscribe({
        next: (token) => {
            console.debug('[execute]::ReCAPTCHA token received! Adding to form for validation...');
            this.form?.controls.recaptcha.setValue(token);
            this.registerUser();
        },
        error: (err) => {
            this.error = this.errors.fatal;
            console.debug('[execute]::ReCAPTCHA failed!')
        },
        complete: () => console.debug('[execute]::ReCAPTCHA subscription completed!')
    });
}
That’s it for our front-end application using v3, next we need to actually validate the token that we received. This is done from a back-end service rather than the front-end application and is a key point of the added security.
Read on to find out how we do this using a simple Spring / Java application.
Note: even if you prefer to use another technology for your back-end service, the following section should give you an idea of how to implement it.
Validate Google reCAPTCHA V3 on the backend
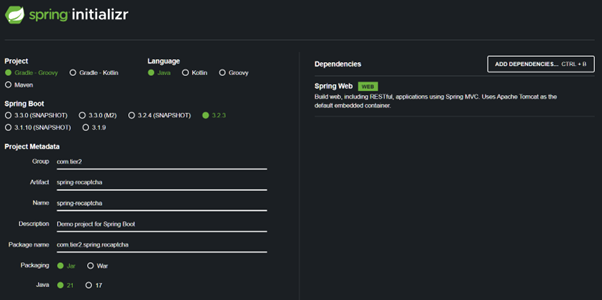
Next, we’re going to create a backend microservice using Spring Boot to validate our token. This validation requires the secret key that we generated earlier so we should never do this part directly in the application.
To get started, launch the Spring initializr here using the following options and click Generate when you’re done:
Once downloaded, extract the zip file onto your file system and open it in your favourite IDE or text editor (we won’t judge!) to make the following changes:
Add a new class named Cors to src/main/java -> com.tier2.recaptcha.config with this code:
@Configuration
@EnableWebMvc
public class Cors implements WebMvcConfigurer {

    @Override
    public void addCorsMappings(CorsRegistry registry) {

        registry.addMapping("/**")
            .allowedOriginPatterns("https://localhost:4200")
            .allowedMethods("POST", "HEAD", "OPTIONS")
            .allowedHeaders(
                "Origin",
                "Accept",
                "Content-Type",
                "Access-Control-Request-Method",
                "Access-Control-Request-Headers"
            )
            .allowCredentials(true);
    }
}
This simply configures our cross-origin request (CORs) settings that are needed for our Angular application to be allowed access to the back-end service.
Create two model classes named RegisterRequest and RecaptchaResponse to src/main/java -> com.tier2.recaptcha.register.model to represent our communication with the Google reCAPTCHA service, adding this code:
public record RegisterRequest(
    String email,
    String password,
    String recaptcha,
    boolean acceptTerms
) {
}
@JsonIgnoreProperties(ignoreUnknown = true)
public record RecaptchaResponse(
    boolean success,
    List<String> errorCodes
) {
}
Add a new controller endpoint named RegisterController to src/main/java -> com.tier2.recaptcha.register and add the following:
@RestController
public class RegisterController {

    private static final String RECAPTCHA_SECRET_KEY = "6LdoAZYpAAAAAHB8-GEl5iWlhiYxj2sg4ZvcNxyy";
    private static final Double CAPTCHA_THRESHOLD = 0.7;

    private final RestTemplate restTemplate = new RestTemplate();

    @PostMapping("/register")
    public boolean register(@RequestBody RegisterRequest request) {

        var response = restTemplate.exchange(
            "https://www.google.com/recaptcha/api/siteverify?secret=" + RECAPTCHA_SECRET_KEY + "&response=" + request.recaptcha(),
            HttpMethod.POST,
            HttpEntity.EMPTY,
            RecaptchaResponse.class).getBody();

        // ... Do some things to register your new user here ...

        return response != null && response.success() && response.score() > CAPTCHA_THRESHOLD;

    }
}
This controller class provides an access point that the front-end application can use to send the completed form details (including CAPTCHA token). It then validates the token by sending a request to the Google reCAPTCHA service providing our secret key and the token provided.
Note: the token is only valid for two minutes so this process must complete relatively quickly i.e. don’t request the token on the front-end before you’re ready to validate it.
The response from the Google reCAPTCHA service includes:
- a success flag
- the user’s score
- a list of error codes
For this example, we’ll just check the success flag and make sure the score is above our validation threshold of 0.7.
Finally, open your command line to the root directory and run the following command to start your new Spring service:
./gradlew bootRun
Result
Once you’ve followed the steps above, the final result should look something like this:

What’s Next?
In this example we only check the user’s score against a pre-set threshold. To fully utilise this in an application, the next step would be to implement additional verification for users who returned a low score i.e. under 0.7 from the reCAPTCHA service. The verification could be to present the reCAPTCHA version 2 challenge or send the user a one-time password to their email or phone number.
Summary
In this article we demonstrated how to implement reCAPTCHA to enhance your application security.
In the next post in our Angular series, we’ll be talking about another feature of Angular: deferred views.
How can Tier 2 help?
If you’re in search of expert assistance in software development, Tier 2 is your dedicated partner. Reach out to discuss your specific requirements and discover how our custom software solutions can elevate your digital initiatives. Talk to Tier 2 for a bespoke software solution leveraging industry-standard Java technologies, agile development, and user-centric design.